🔎 Reverse Image Search
Image search techniques made simple: upload a photo or paste a URL and search 6 engines at once. 100% free, nothing stored.
🔒 Your image is never stored on our servers longer than 24 hours and is never shared.
An AI detector false positive happens when a detector labels a real, camera-taken photo as AI-generated. Detectors guess from pixel patterns and never see how the photo was made, so ordinary editing, denoising, upscaling or recompression can push a genuine photo over their line. It does not mean your photo is fake.
If an AI detector says your photo is AI, you are not alone. Photographers, sellers, journalists and ordinary phone users are all being flagged, and the flag usually arrives with no explanation beyond a percentage. The search often starts with a sentence like “my real photo was flagged as AI” typed into Google in a panic. A score is not a verdict, and a single tool’s opinion is not proof of anything. What follows is the full picture: what a false positive is, the six everyday causes behind it, what a percentage actually means, a real test I ran on a genuine photo, and the evidence pack you can hand to any platform, marketplace or client to clear your photo.
What is an AI detector false positive?
An AI detector false positive is a wrong call by an AI image detector: it looks at a real photograph and reports it as AI-generated. The detector is a statistical classifier, a model trained on two piles of example images, real and synthetic, that learns which pixel patterns sit in each pile. When you upload a photo, it measures how closely your pixels resemble the synthetic pile and returns a probability. It has no access to your camera, your files or the moment you pressed the shutter, so it cannot know how the image was made. It can only guess, and sometimes the guess is wrong.
That distinction matters, because a false positive is not the same as a provenance check. A classifier estimates which class your pixels resemble. A provenance check, such as reading C2PA Content Credentials, inspects a signed record of where the file came from. A provider watermark check, such as SynthID, looks for an invisible mark left by a participating generator. These systems look at different signals, which is why they can disagree with each other, and why a classifier score on its own should never be treated as the final word.
Why does an AI detector say my photo is AI?
When an AI detector says my photo is AI, the first question is what the detector actually saw. Usually it is reacting to something that happened to the file after you took it, or to the way the photo looks, rather than to anything artificial in the scene. Six everyday causes account for most false positives, and each one changes the pixel statistics the detector reads.
| Cause | What it does to the photo | Why the detector reacts |
|---|---|---|
| AI denoise and clean-up | Rebuilds texture, removes sensor noise | Machine-made texture replaces camera noise |
| Heavy retouching | Smooths skin, evens tones | Polished finish resembles generated faces |
| Upscaling | Invents missing detail | New pixels look unnaturally regular |
| Phone processing | HDR, night mode, portrait blur | Reconstructed regions, not raw sensor data |
| Screenshots and re-saves | Recompresses, strips metadata | Compression fingerprints are disturbed |
| Clean studio look | Smooth light, soft background | Matches the look of synthetic training data |
AI denoise is the biggest single trigger. Tools such as Adobe’s AI denoise, DxO DeepPRIME and Topaz remove the sensor noise that detectors treat as a signature of real capture, and replace it with detail their own neural networks rebuild. A high-ISO night shot cleaned this way can look statistically close to a diffusion model’s output. The same logic applies to upscaling: when missing detail is reconstructed, the new pixels carry a highly regular texture that reads as synthetic.
Retouching and portrait effects push the same way. Strong clarity and dehaze adjustments, frequency-separation skin smoothing and heavy colour grading move a photo away from the look of unedited camera output and toward the polished, even texture a model associates with generated faces. Our guide to telling if a photo is photoshopped explains the visual signs of this kind of editing. The irony is sharp: the better a photographer’s post-processing, the more likely the work is to be flagged. The detector is not identifying AI generation. It is identifying polish.
Your phone is already processing before you edit anything. Modern phones merge several frames for HDR, denoise in night mode, sharpen edges and blur backgrounds in portrait mode. The file that leaves your phone is a computational reconstruction, not untouched sensor output, and detectors can read those smooth, rebuilt regions as synthetic. Long telephoto shots have the same problem in a different form: a sharp subject against a uniform blurred field is a look generative models reproduce constantly.
Screenshots and social-media copies are a separate trap. Every time an image passes through a messaging app, a social platform or an email service, it is re-encoded. That disturbs the compression artefacts and frequency-domain fingerprints a detector relies on, so a wholly genuine photo can arrive looking statistically unfamiliar. A screenshot is worse still: it is a brand-new file with new dimensions, new compression and usually no metadata at all. If the detector tested a screenshot of your photo rather than the photo itself, the result says more about the screenshot than about your work.
Finally, there is the arms race underneath all of this. A detector is trained on the artefacts of the generative models that existed when it was built, and each new generation of image synthesis erases the artefacts the previous detector learned to spot. As those artefacts disappear, the detector loses its grip on new synthetic images and starts flagging real photographs that happen to share statistical properties with the newer generators. It was never measuring whether an image is real, only how closely the image resembles its training set, and those two things drift further apart with every model release.
What does an “80% AI” score actually mean?
An AI image detector can be wrong in both directions: it can flag a real photo, and it can pass an AI image as real. That is why one classifier score cannot establish origin either way, and why the evidence around the photo matters more than the number on the screen.
An “80% AI” score means the detector’s model assigned stronger evidence to its AI class than to its comparison class for the file you uploaded. It does not mean there is an 80% chance the photographer lied, and it does not mean 80% of the pixels were generated. It is a confidence number from one model, on one version of one file, and scores from two services are not directly interchangeable. A 0.8 result on one tool may not mean the same thing after that service updates its model.
The disagreement between tools is measurable, and it is large. NewsGuard’s audit of AI image detectors, published in May 2026, ran 15 authentic news photographs through five leading detectors and found that three of the five misclassified real images. According to NewsGuard’s findings, the tools collectively declared authentic images to be AI-generated 13.33 percent of the time, and the worst tool flagged six of the fifteen, or 40 percent, as AI-generated. NewsGuard also found that in 35 of the 45 images it tested, at least one tool reached a different verdict from the rest. If three tools can look at the same photo and disagree, no single score can carry the weight of a verdict. Scores vary by tool, and our comparison of the best AI image detector tools shows how the main options differ.
The same NewsGuard audit shows how much light editing matters. When NewsGuard submitted lightly edited versions of the same real photos, asking an AI tool only to enhance the lighting and blur the background, ScamAI labelled 93 percent of them as AI-generated, AI or Not labelled 87 percent, and ZeroGPT labelled 80 percent, while Hive and Sightengine flagged only 27 percent. Sightengine earned that low flag rate honestly: our guide to the Sightengine AI image detector runs it on a known AI portrait (99%) and a real 2009 photograph (0%), and explains how to read its per-generator breakdown. Those figures, all attributed to NewsGuard’s audit, describe the same files judged by different models. The lesson is practical: record the tool name, the date and the exact file you tested, and use cautious language. Write “the uploaded JPEG received a high AI-likelihood score from Tool A on 9 November 2026”, never “the photo is 80% fake”.
Worked test: I ran a real photo through two AI detectors
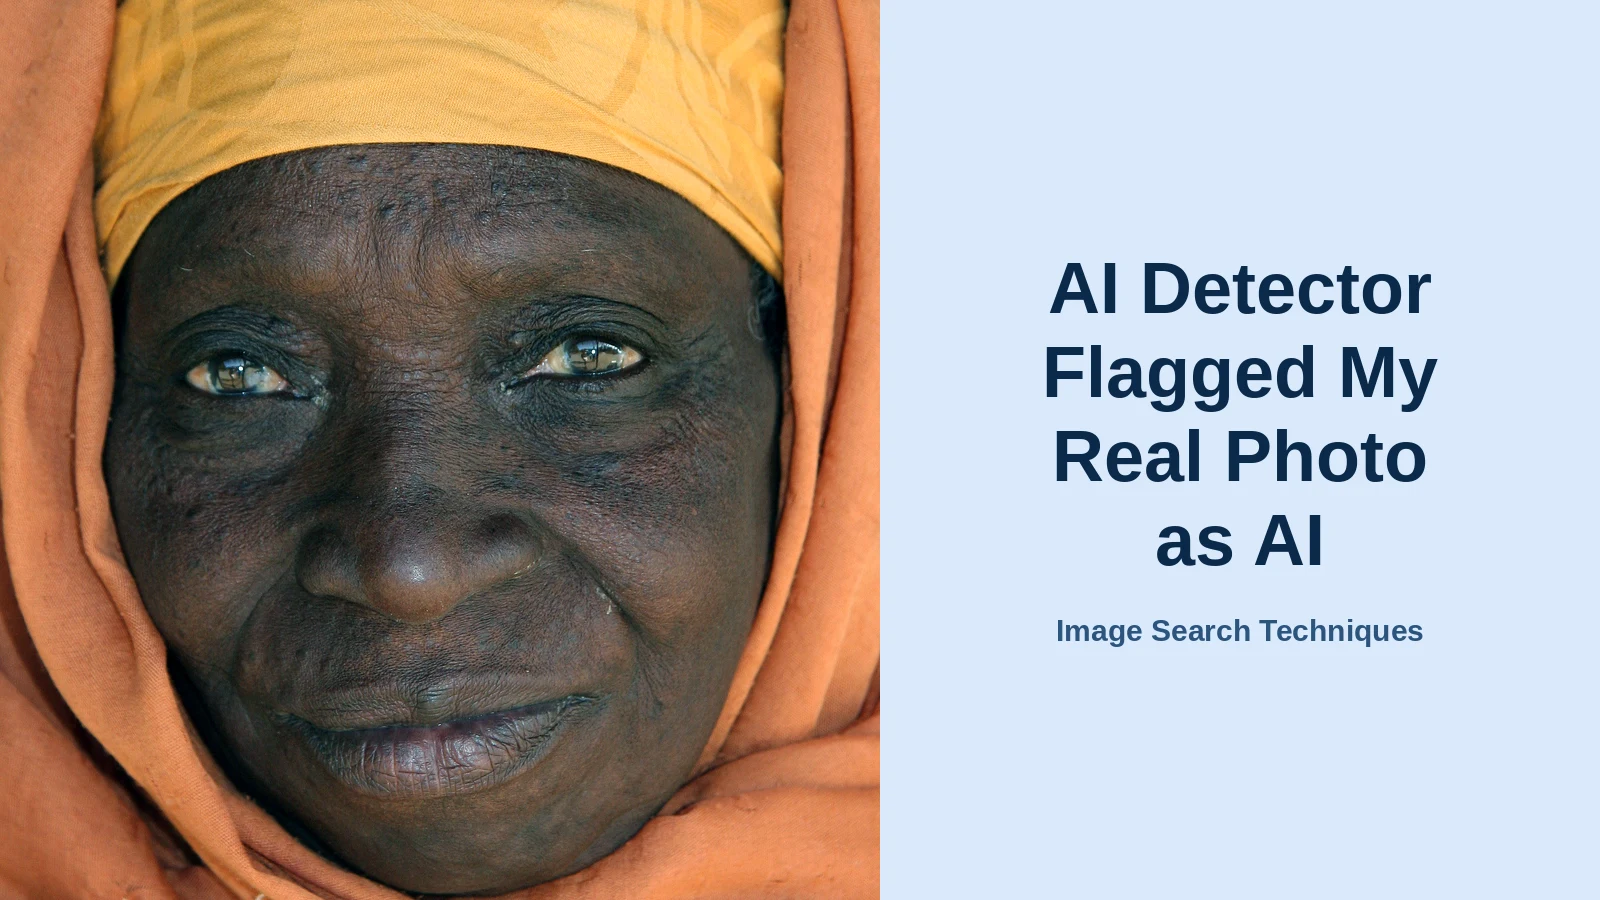
I wanted this guide to rest on a test I actually ran, not on a claim about what detectors do in general. So on 9 November 2026 I took a real photograph, a portrait from Wikimedia Commons titled “Elderly Gambian woman face portrait”, shot on a Canon EOS 20D with its EXIF data intact, and uploaded the untouched original file to two free AI detectors that needed no sign-in. Here is exactly what happened.
| Detector | File tested | Result on 9 Nov 2026 |
|---|---|---|
| Hive Moderation | Untouched original | 0% likely AI-generated |
| Is It AI | Same file | Likely human-made |
Hive Moderation, tested through its free demo, returned “0% Likely to be AI-Generated Image” and “0% Likely to be Deepfake”. Every generation source it lists, including Sora, Pika, Haiper, Kling and Luma, also showed 0%. The page added one honest note: “No Content Credentials found for this media”, because this 2008 photograph predates C2PA signing entirely. See our Hive AI detector guide for how to run this check yourself.
Is It AI agreed. Its free check stamped the same file “Likely human-made”. It showed no numeric score, because the confidence figure and full breakdown are locked behind an account, so I report no percentage for this tool. One of its three free checks was used.
Two other tools I tried could not be tested: Illuminarty’s free demo reported that its service was unavailable, and AI or Not asked for an account before it would accept an upload, so I did not use it. I report only the two tools that actually ran.
Both tools that ran got this one right, and that is itself the lesson. This was the untouched original: full resolution, EXIF intact, never re-saved, never screenshotted. NewsGuard’s audit, quoted above, shows the same class of tools misclassifying real photographs, and misclassifying lightly edited ones far more often, with ScamAI flagging 93 percent of lightly edited real photos as AI-generated according to NewsGuard. The difference between my test and those failures is the file. Test the original and the detector sees a camera photo. Test a denoised, upscaled or screenshotted copy and the same detector can see something else entirely. That is why the evidence pack in the next section starts with the original file, and why a flag against an edited copy is never the end of the story.
How to prove a photo is not AI-generated: the evidence pack
Proving a photo is real is not about winning an argument with a detector. It is about showing a chain of evidence that no single score can outweigh. Gather the items below in order, strongest first, and keep them together as one pack you can hand to a platform, a marketplace, a client or a competition judge. Every item answers a different question, and together they are far harder to dismiss than a percentage.
| Order | What to gather | What it proves |
|---|---|---|
| 1 | Original camera file | The photo came from a camera |
| 2 | RAW file, if you shot one | Unprocessed sensor data exists |
| 3 | Burst frames and outtakes | The moment happened in sequence |
| 4 | EXIF and metadata | Camera, settings, date and time |
| 5 | Content Credentials | Signed provenance, when present |
| 6 | Earliest publication | The image existed before the claim |
| 7 | Your edit history | What was changed, and what was not |
Step 1: start with the original file, not a copy. The strongest single item is the file as it left your camera or phone: the original JPEG or HEIC, untouched, with its metadata intact. Do not send a screenshot, a WhatsApp download or a social-media copy, because each of those is a new file that has lost the very signals that support you. If you edited the photo, keep the original beside the edited export and be ready to show both.
Step 2: add the RAW file if you have one. A RAW file is unprocessed sensor data, and no AI image generator produces one. Even a single RAW in your archive settles the question for anyone who understands what it is. If you shoot JPEG only, say so plainly and lean on the next items instead.
Step 3: show the frames around it. Burst frames, outtakes and the shots taken seconds before and after are powerful evidence, because a generator makes one image at a time while a camera captures a sequence. A contact sheet or a short screen recording scrolling through the neighbouring frames in your camera roll shows a real moment unfolding, and it is very hard to fake convincingly.
Step 4: let the metadata speak. EXIF data records the camera model, lens, shutter speed, aperture, ISO and the date and time of capture. Open it on the original file and screenshot or export it. Missing EXIF proves nothing on its own, because messaging apps, social platforms and privacy tools strip it routinely, but present EXIF that matches the story of the photo is strong supporting evidence. If you need a refresher on what metadata contains and how to read it, our guide to image metadata walks through it.
Step 5: check for signed provenance. If your camera, phone or editing app writes C2PA Content Credentials, verify them at the official Content Credentials verify tool and include the result. A valid credential shows who or what signed a set of provenance statements and whether the signed data still validates. A missing credential proves very little, because screenshots, exports and platforms can remove metadata, but a present and valid one is the closest thing to a certificate your photo can carry. Our guide to checking Content Credentials on a photo explains how to read them step by step.
Step 6: prove the photo existed first. Use a reverse image search to find the earliest copy of the image online. An early publication date, your own portfolio post, or the original listing predating the accusation all support you. Save screenshots of the earliest results with their dates visible, because a search result page can change.
Step 7: be honest about your edits. List what you actually did: denoise, crop, colour grade, skin retouching, background blur. Naming the edits yourself takes away the detector’s only real argument, because you are showing that the “AI-like” qualities have a named, ordinary cause. It also protects you if someone later finds the edit history: a disclosed edit is a workflow, an undisclosed one looks like a secret.
How to appeal when a platform flags your photo
Most flags arrive as an automated decision, and most platforms have a human review route behind it. The evidence pack in the section above is built to prove photo authenticity to a platform, a marketplace or a client, so the appeal works best when you treat the detector score as the starting point of the conversation, not the subject of it. Do not argue that the detector is broken. Show the evidence pack and ask for a human to look at it.
- Save the flag first. Screenshot the exact message, the score, the tool name if shown, and the date. If the photo is removed, that notice may disappear with it, and you will need the record for the appeal.
- Do not delete and re-upload. Deleting the photo destroys the post’s history and can look like an admission. Leave the flagged item in place and appeal through the platform’s own channel.
- Send the evidence pack, not an essay. Attach the original file, the RAW if you have it, two or three neighbouring frames, and the metadata screenshot. Add one short paragraph naming your edits and the date the photo was taken. Keep it factual and short.
- Ask for a human review in plain words. Write something like: “This is my own photograph, taken on [date] with [camera/phone]. The detector score appears to reflect my denoise and retouching. Please review the original file and neighbouring frames attached.” Name the decision you want: reinstatement, removal of the AI label, or a manual review.
- Escalate once, with a new fact. If the first appeal is refused by another automated reply, reply once more and add one new piece of evidence you did not send before, such as the RAW file or the earliest publication link. If there is still no human response, take the same pack to the platform’s support form or, for a marketplace, to the seller-support channel, and keep a copy of everything you sent.
If the flag came from a client or an employer rather than a platform, the same pack applies, with one change: lead with the neighbouring frames and the original file, because a person looking at a sequence of real frames rarely needs convincing. If the flag came from a competition judge, include the RAW and the edit list, and ask which of their rules the photo is said to break. A clear answer to that question usually ends the dispute, because most competition rules ban AI generation, not ordinary editing.
How to stop it happening to your next photo
You cannot make detectors perfect, but you can make your next photo much easier to defend. The habit that matters most is keeping the original. Shoot RAW plus JPEG when your camera or phone allows it, and keep the originals in a folder you never edit in place. Export copies for sharing and editing, and leave the camera files untouched. That single habit gives you the strongest item in the evidence pack for every photo you take.
Turn on provenance signing where it is available. Some cameras, phones and editing apps now write C2PA Content Credentials into the file, recording the device and the edits applied. A signed file carries its own history with it, and that history survives as long as the file is not stripped by a platform. It is not a guarantee against a false positive, but it is the only item in the pack that a platform can verify without trusting your word.
Finally, change how you export for platforms. Send the highest-quality export you can, not a screenshot of your own photo, and avoid running a photo through a messaging app before uploading it somewhere that will judge it. Each re-save is another chance for the file to pick up the compression and reconstruction artefacts that push a detector over its line. And if you use AI denoise or an AI upscaler, note it in the file’s description or your own records. A disclosed tool is a workflow choice; a detector discovering it for you is an accusation.
FAQs
Can editing a real photo make it look AI-generated?
Yes. Denoising, sharpening, portrait effects, beauty filters, restoration and upscaling can change the pixel patterns a detector reads, because they rebuild texture and remove the sensor noise that marks a real capture. The result shows how the processed file was classified, not how the original scene was captured. Test the original file, not the edited export.
Does a high AI score prove the image is fake?
No. A score is a model estimate, not a verdict. NewsGuard’s May 2026 audit found that three of five leading detectors misclassified real news photographs, with the worst flagging 40 percent of them as AI-generated. Check the original file, provenance signals, provider watermarks and source context before making any claim about a photo.
Why do screenshots get different AI scores?
A screenshot creates a new file with new dimensions, compression, colour handling and usually different metadata. Those changes alter both the pixel classification and the provenance result, so the detector is judging the screenshot, not your photo. Always test the earliest original file you have, and keep screenshots out of the evidence you send.
Should I keep testing until a detector says “human”?
No. Decide in advance which versions and tools you will test, then report all the results, including the ones that disagree with you. Testing repeatedly until one result feels right is selective retesting, and it creates confirmation bias while making the process impossible to reproduce. Record every result with its tool, date and file.