🔎 Reverse Image Search
Image search techniques made simple: upload a photo or paste a URL and search 6 engines at once. 100% free, nothing stored.
🔒 Your image is never stored on our servers longer than 24 hours and is never shared.
Spots on a leaf, a white powdery coating, or leaves curling for no clear reason, the first thing most of us do now is take a photo and ask the internet what is wrong. That instinct is sound, but only if the photo is used the right way. This guide shows you how to identify plant disease from photo evidence: how to take a useful photo, how to reverse-search it, how to match the symptom pattern, and, just as importantly, where a photo stops being enough. If the plant is not sick but simply growing where you do not want it, the job is naming it first, and our guide to identifying a weed from a photo covers that.
Short answer: photograph the damage and the whole plant, reverse-search it with Google Lens, then compare the pattern against a trusted source such as the RHS. A photo can suggest a likely cause, but it cannot confirm a pathogen: only a local extension service or plant clinic can do that.
A plant disease is damage caused by a living pathogen, a fungus, bacterium or virus, or by a microscopic pest, as opposed to damage from watering, weather, feeding or sun. That distinction matters, because the same brown spot can come from a fungus, a sun-scorched leaf, or a nutrient shortage, and each one needs a different response. A photo is the fastest way to start narrowing it down, and for many common problems it is all you need to reach a sensible first step.
What does it mean to identify a plant disease from a photo?
Identifying a plant disease from a photo means using pictures of the damage, not the plant’s name, to work out what is wrong. You start with what you can see: the shape and colour of the spots, whether there is powder or mould, whether leaves are curling, yellowing or dropping, and which part of the plant is affected first. Then you match that visible pattern against known diseases, either by reverse-searching the photo or by comparing it with reference pictures from a trusted source.
There are two different jobs here, and keeping them apart saves a lot of confusion. The first is naming the plant, which is a species identification problem. The second is naming the problem on a plant you already know. This guide is about the second job. If you do not yet know what plant you are looking at, identify the species first, our guide to reverse image search for plants covers that, and if it is a tree, our guide to identifying a tree from a photo walks through the leaf, bark and winter bud clues, and then come back here with the plant’s name in hand, because every disease match depends on knowing the host. If the plant is a houseplant and you need the exact variety, not just the species, see our guide to identify a houseplant variety from a photo.
One honest limit runs through everything that follows. A photo shows symptoms, and many different causes produce similar symptoms. The Royal Horticultural Society (RHS) describes rose black spot, for example, as purple or black spots on leaves followed by early leaf fall, but several other rose problems start with dark spots too. A photo match is a strong lead, not a laboratory result. Treat it as a hypothesis you then check, not as a diagnosis you act on with chemicals.
How do I photograph a sick plant so the photo is actually useful?
A blurry photo of a whole bush tells an app, and an expert, almost nothing. The Virginia Tech Extension service, which identifies plant diseases from photos sent by gardeners, asks for close-up shots of the diseased leaf, stem or trunk and a photo of the whole plant and one of it in the landscape, because the pattern across the plant is part of the evidence. Follow these steps and your photo will work far harder for you.
- Photograph the worst leaf first, close up. Fill the frame with one affected leaf, in focus, in daylight. The spot edges, any yellow halo, and any powder or fuzz must be visible.
- Photograph the underside of the same leaf. Rust pustules, downy mildew fuzz and many insect eggs sit underneath, where a top-down photo never looks.
- Photograph the whole plant. Step back and show whether the damage is on old leaves only, new growth only, one side, or the whole plant. That pattern is often the single most useful clue.
- Photograph the plant in its place. Include the pot, bed or border so an expert can see the setting, the soil, and neighbouring plants.
- Add a sense of scale. Put a coin or your hand beside a spot if the size is hard to judge. A 2 mm spot and a 20 mm blotch point in different directions.
- Note what changed recently. Write down when the symptoms appeared, whether watering, feeding or weather changed, and whether nearby plants show the same thing. A photo cannot carry this context, so carry it yourself.
Do not photograph a completely dead leaf and expect an answer. Extension services point out that a fully dead leaf or stem is not a sufficient sample, because the evidence of what killed it has rotted away with it. Photograph the boundary where healthy tissue meets damaged tissue, that transition zone is where the cause is still visible.
How can reverse image search help identify a plant disease?
Reverse image search works by matching your photo against billions of images already on the web, and returning the pages where the same or a similar image appears. For a sick plant, that is genuinely useful: a matching image usually sits on a page that names the disease, describes its symptoms, and explains what to do. It turns an unknown spot into a shortlist of named candidates in seconds, and it costs nothing. Our main guide to reverse image search explains the general technique; here is how to aim it at a plant problem.
- Upload your close-up leaf photo to Google Lens. Use the camera icon at lens.google.com or in the Google app, and upload the clearest close-up you took, not the whole-plant shot.
- Read the identification first, then the results. Lens often states what it thinks the image shows, and its top results usually include the disease name. Note the name, then check it rather than accepting it.
- Open two or three matching pages and compare the symptom description with your plant. Do the spot shape, the leaf position and the time of year line up? If a page describes orange pustules and your leaf has black spots, that match is wrong, however confident the tool sounded.
- Run the same photo through TinEye as a second opinion on provenance. TinEye finds exact copies of the image elsewhere online, which tells you where a reference photo came from and how widely it has been reused. A photo that appears on university extension pages is a stronger reference than one that only appears on random blogs.
- Search the disease name plus your plant’s name. A general match for “black spot” becomes a real lead only when it is black spot on roses, confirmed by a source that describes roses specifically.
Plant disease apps such as PictureThis, PlantIn and Planta offer the same idea in app form: photograph the sick plant and get a disease name and treatment plan. They are convenient, and for common problems they are often right, but they are guessing from the same pixels you are, and their treatment advice is only as good as their identification. Use an app as a second opinion alongside Lens, never as the only voice, and never let any app’s answer replace a human expert when the plant matters or the treatment involves chemicals.
Worked test: what happened when I reverse-searched a real black spot photo?
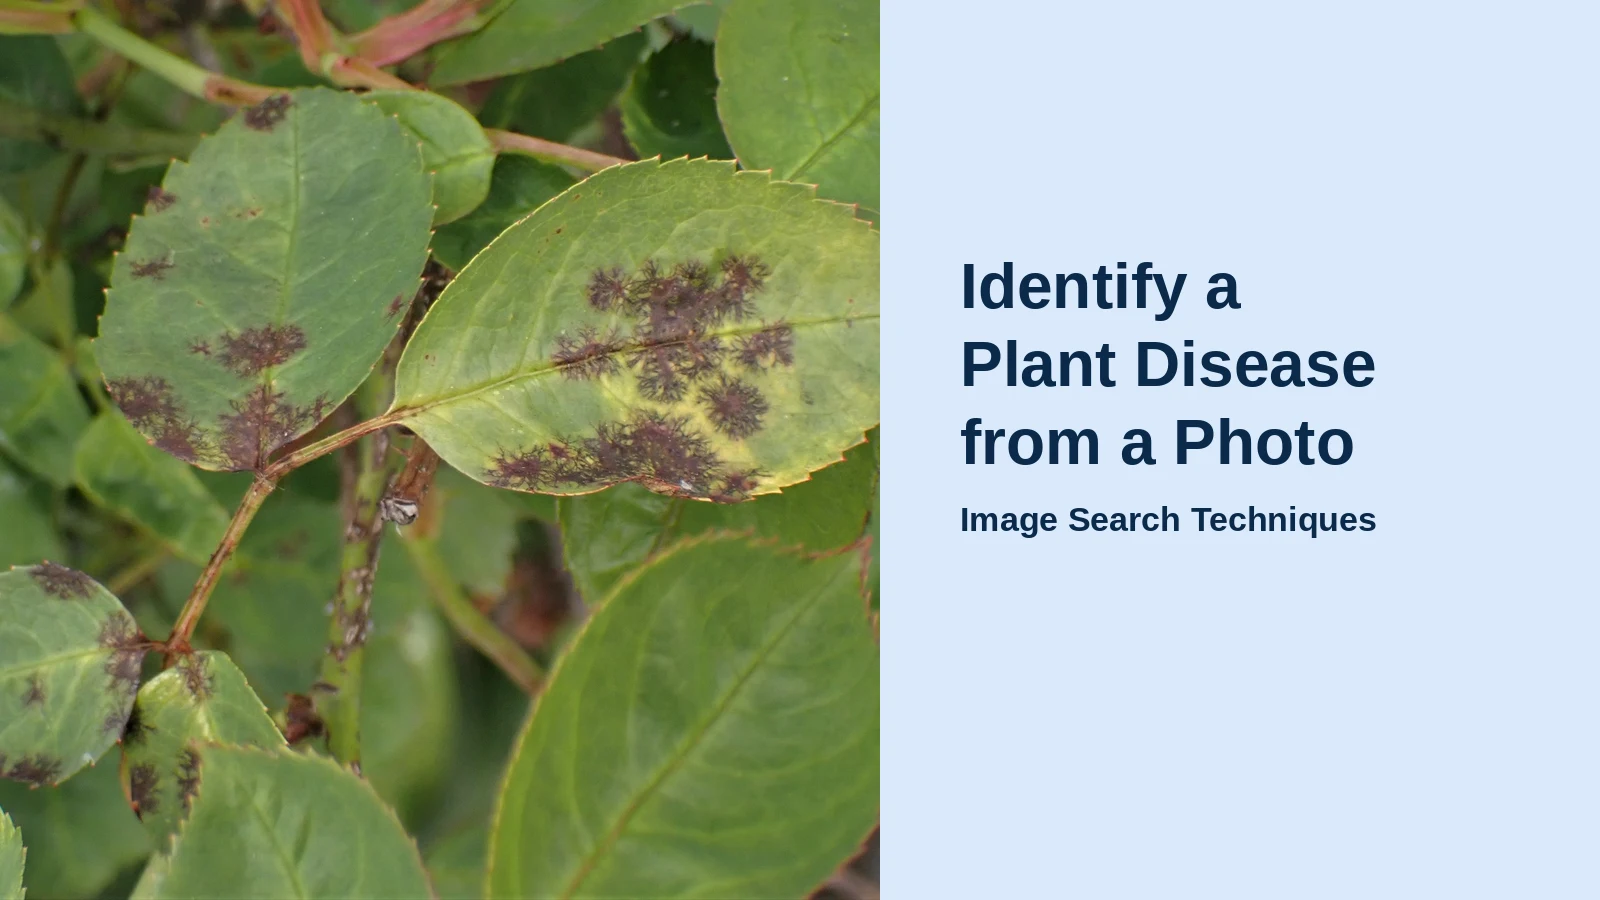
To test this properly, I used a real, labelled photograph rather than a made-up example: a rose leaf with black spot disease (Diplocarpon rosae), photographed on 28 April 2021 by iNaturalist user giantcicada and published on Wikimedia Commons under a CC BY 4.0 licence. The leaf shows the classic signs, dark, fringed black spots with yellowing around them. On 10 November 2026 I uploaded that exact photo to Google Lens and to TinEye, without signing in to either service. Here is exactly what each one did.
Google Lens identified the disease outright. Its AI Overview stated that the image shows rose black spot (Diplocarpon rosae), a common fungal disease affecting rose bushes. Its top visual result was headed “Rose Black Spot (Diplocarpon rosae)” on iNaturalist, and its exact matches included the very Wikimedia Commons file the photo came from, dated 28 April 2021. In other words, Lens both named the disease and traced the photo to its source page. The other visual matches were a sensible shortlist: The Spruce’s guide to treating and preventing black spot on roses, a Gardener’s Path article, and a Facebook gardening discussion about dark spots on rose leaves.
TinEye found nothing at all. It reported “0 matches” after searching over 86.6 billion images, explaining that it had probably not yet crawled any page where this image appears, and a reload of the results page confirmed the same zero. That is not a failure of the photo; it is a limit of TinEye’s index, which is smaller and differently crawled than Google’s. The lesson is practical: when one engine returns nothing, try another before concluding the photo is unidentifiable. A zero on TinEye means “not in TinEye’s index”, not “this is not a disease”.
What does this test actually prove? It proves Lens can be strikingly good when the disease is common, the photo is clear, and the image already exists in reference collections. It does not prove Lens will name your plant’s problem. A rare disease, a poor photo, or a symptom that looks like three different problems will all produce weaker results. The honest way to use the test is as a filter: Lens gives you a named candidate, and you then verify that candidate against the symptom table below and a trusted source such as the RHS page on rose black spot, which describes black spot as the most serious disease of roses, caused by the fungus Diplocarpon rosae, with purple or black spots on leaves and early leaf fall from spring onwards.
What do spots, mould and curling leaves usually mean?
The symptom pattern is the core of any photo diagnosis. The table below is the diagnostic shortcut for this guide: find the pattern that matches your photo, read the likely cause, and take the safe first action listed. Every row is a starting point for verification, not a final diagnosis, and where the table says “confirm before treating”, that means with an extension service or plant clinic, not with a second app.
| What the photo shows | Likely cause | First safe action |
|---|---|---|
| Round black or brown spots with fringed edges, leaves yellowing and dropping | Fungal leaf spot, e.g. rose black spot (Diplocarpon rosae) | Pick off affected leaves, bin them (do not compost), improve air flow; confirm with the RHS disease page |
| White powdery coating on leaves and stems that wipes off | Powdery mildew (fungus) | Remove worst leaves, water at the base, space plants for airflow; confirm before spraying anything |
| Yellow patches on top of the leaf, grey-purple fuzz underneath | Downy mildew (fungus-like organism) | Reduce leaf wetness, avoid overhead watering, remove badly affected leaves; confirm before treating |
| Orange, rusty or brown powdery pustules, mainly under the leaf | Rust (fungus) | Remove affected leaves, avoid wetting foliage, check neighbouring plants of the same species |
| Leaves curling, thickened or blistered, often red-tinged | Leaf curl (fungus on peach/nectarine) or virus on other plants | Do not guess: curling has many causes, photograph both sides and ask an expert |
| Light and dark green mosaic patches, twisted or stunted growth | Virus, often spread by aphids or whitefly | Isolate the plant, control the insects, do not take cuttings; confirm before removing the plant |
| Water-soaked, translucent spots with irregular edges, sometimes slimy | Bacterial leaf spot or soft rot | Stop overhead watering, remove affected parts with clean tools, disinfect tools between cuts |
| Wilting even though the soil is wet, black mushy roots | Root rot (fungus, from waterlogged soil) | Check drainage, let soil dry, remove rotted roots; the photo alone cannot confirm the pathogen |
| Grey fuzzy mould on leaves, stems or fruit, parts rotting | Grey mould (Botrytis cinerea) | Remove rotted material, improve ventilation, avoid wetting flowers and fruit |
Two details in the table deserve emphasis. First, the position of the damage matters as much as its shape: powdery mildew sits on the upper leaf surface and wipes off, while downy mildew shows its fuzz on the underside and cannot be wiped off, mixing those two up leads to the wrong treatment. Second, several rows end with “confirm before treating”, and that is deliberate. A photo match plus a table is enough for safe first steps such as removing a leaf or improving airflow, but it is not enough for choosing a chemical treatment.
How do I tell a disease from a nutrient problem or pest damage?
Many sick-plant photos are not diseases at all. A plant short of iron turns yellow between green veins; a plant short of nitrogen yellows its oldest leaves first, evenly, without spots; sun scorch browns leaf edges after a sudden move into bright sun; and caterpillar or slug feeding leaves holes with clean edges rather than spreading blotches. These lookalikes are the reason a single photo so often misleads: the symptom is real, but the cause is not a pathogen.
| Clue in the photo | More likely a disease | More likely something else |
|---|---|---|
| Spots with a clear edge or a yellow halo | Yes, fungi and bacteria make defined lesions | No, deficiencies rarely make sharp-edged spots |
| Even yellowing across whole leaves or the whole plant | Rarely | Yes, nutrient shortage or overwatering |
| Damage spreading from plant to plant | Yes, infections spread | No, a feeding or watering problem stays put |
| Powder, fuzz or pustules visible on the leaf | Yes, that is the pathogen itself | No, deficiencies show no growth on the leaf |
| Holes, notches or chewed edges | No | Yes, insects, slugs or caterpillars |
| Only the oldest leaves affected, in the same pattern on every plant | Sometimes | Yes, often a nutrient or watering issue |
When the clues point away from disease, the fix is usually cultural rather than chemical: correct the watering, feed the plant, or move it. When they point towards disease, the next step is not a spray, it is confirmation. And when the clues are genuinely mixed, that is exactly the case to send to an expert with your photos, rather than to keep guessing from search results.
When should I ask an expert instead of trusting a photo match?
Ask an expert whenever the plant matters to you, the treatment would involve chemicals, the plant is a food crop, or the photo match is uncertain. That covers more cases than most people expect, and it is where the photo-first workflow earns its keep, because a good set of photos is precisely what an expert needs to start. In the UK, RHS members can ask RHS Gardening Advice, and many local gardening groups and garden centres will look at a photo. In the US, your state university’s cooperative extension service runs a plant clinic: Virginia Tech Extension, for example, asks gardeners to email high-quality photos and, if a sample is needed, to bring a 6- to 18-inch portion of the plant that includes the region where live tissue is turning dead or dying, since a completely dead leaf is not enough to diagnose from. The University of Missouri’s Plant Diagnostic Clinic offers the same service digitally, asking for 4–6 photos per sample and normally returning a diagnosis within 1–2 days.
What to send, in short: your best close-up, the underside shot, the whole-plant photo, the setting shot, and a few lines about when the symptoms appeared and what changed. That package is the difference between a useful answer and a shrug. And if the expert asks for a physical sample, follow their instructions exactly, bag it as they direct, keep it cool, and send it early in the week so it arrives fresh.
The same rule applies in the other direction: a photo match from an app or a search engine is never a reason to eat, sell or serve produce from a plant that looks diseased. A photo cannot confirm whether a pathogen or a residue is present on fruit or leaves, and it certainly cannot confirm that something is safe to eat. If a food plant looks diseased, treat the produce as suspect, get the diagnosis confirmed, and only then decide what to do with the crop. Never present a photo match as safe-to-eat evidence, to yourself or to anyone else.
What safe first steps can I take while I wait for a diagnosis?
There is a lot you can safely do before any diagnosis is confirmed, and all of it is about stopping the problem spreading rather than curing it. First, isolate the plant if you can, so spores or insects do not reach its neighbours. Second, remove the worst affected leaves and bin them, do not compost them, because home compost rarely gets hot enough to kill fungal spores. Third, water at the base of the plant in the morning, so leaves stay dry and any splash has the day to dry off. Fourth, improve airflow by spacing plants and pruning for an open shape. Fifth, clean your tools and your hands after handling the plant, since spores and bacteria travel on secateurs and fingers alike. And sixth, resist the urge to spray anything until you know what you are treating: the RHS advises against routine fungicide use on roses with black spot, favouring cultural control and resistant varieties instead, and the same restraint applies to most garden diseases.
Keep a dated record while you wait: one photo a week of the same leaves, plus a note of what you did. If the problem spreads, that record is exactly what the extension service will ask for. If it stops, the record tells you which of your steps probably helped. Either way, you will have turned a worrying photo into a small, useful case file, which is the real skill this guide is teaching. If you want to practise the photo workflow itself, our guide to how to reverse image search walks through the same Lens and TinEye steps on any image, and our roundup of the best free reverse image search tools for 2026 compares the free engines you can use for the job. And if the mystery is the plant itself rather than its illness, start with what is this picture, our hub guide to identifying anything in a photo.
FAQs
Can a photo identify a plant disease for certain?
No. A photo can narrow the problem to a likely cause, especially for common diseases with distinctive symptoms, but it cannot confirm a pathogen. Several diseases, deficiencies and pests produce similar spots, mould or curling. Confirmation needs a physical sample tested by a local extension service or plant clinic, so treat any photo match as a strong lead before treating.
What is the best app to identify a plant disease from a photo?
Google Lens is the best free starting point, because it names what it sees and links to reference pages, as our rose black spot test showed. Disease apps such as PictureThis add treatment plans but guess from the same pixels. Use Lens and one app as two opinions, then verify the answer against an RHS or extension page before acting.
My plant has brown spots on its leaves, is it a disease?
Not necessarily, brown spots can be a fungal leaf spot, sun scorch, a watering problem, or a nutrient shortage. Check the pattern: sharp-edged spots with a yellow halo that spread point towards disease, while even browning after a hot day points towards scorch. Photograph the spots and the whole plant, then check the diagnostic table above.
Can I eat fruit from a plant that looks diseased?
Do not decide that from a photo: a photo match cannot confirm whether a pathogen is present on fruit or leaves, and it is never safe-to-eat evidence. Keep the produce aside and get the problem diagnosed by your local extension service or plant clinic before eating or serving the crop.