🔎 Reverse Image Search
Image search techniques made simple: upload a photo or paste a URL and search 6 engines at once. 100% free, nothing stored.
🔒 Your image is never stored on our servers longer than 24 hours and is never shared.
A single photograph can tell you a surprising amount about an old camera, its maker, model, rough age, and whether it deserves a closer look. This guide explains how to work out what film camera is in a photo before you spend any money.
To identify a vintage camera from a photo, read the model name and serial number on the top plate, read the lens ring for the lens name and aperture, then match the serial against the maker’s serial table and compare the body with a reference site such as Camera-wiki. Ask the seller for close-ups of anything unclear.
Start with the body shape, since that narrows the field before you read any marking: a simple box camera, a folding camera with bellows, a twin-lens reflex with two lenses stacked vertically, a rangefinder, a single-lens reflex, or a compact point-and-shoot. The film format helps too: look for 35mm, 120 medium format, 126 or instant-film markings on the body or inside the film chamber, since each format points to a different family of cameras.
A vintage camera, for this guide, is a film-era camera, typically made before 1990. That is Estimonia’s working definition in its vintage camera value guide. If you are trying to work out what something in a picture is more generally, our guide to what is this picture covers the wider process of identifying an unknown object from a photo.
One direction matters before anything else: this guide identifies a camera pictured in a photo, the object itself. The opposite question, which camera took a particular photo, is a different job, answered from the file’s hidden data. If that is what you need, see our guide on how to find your lost or stolen camera with EXIF data instead.
What does it mean to identify a vintage camera from a photo?
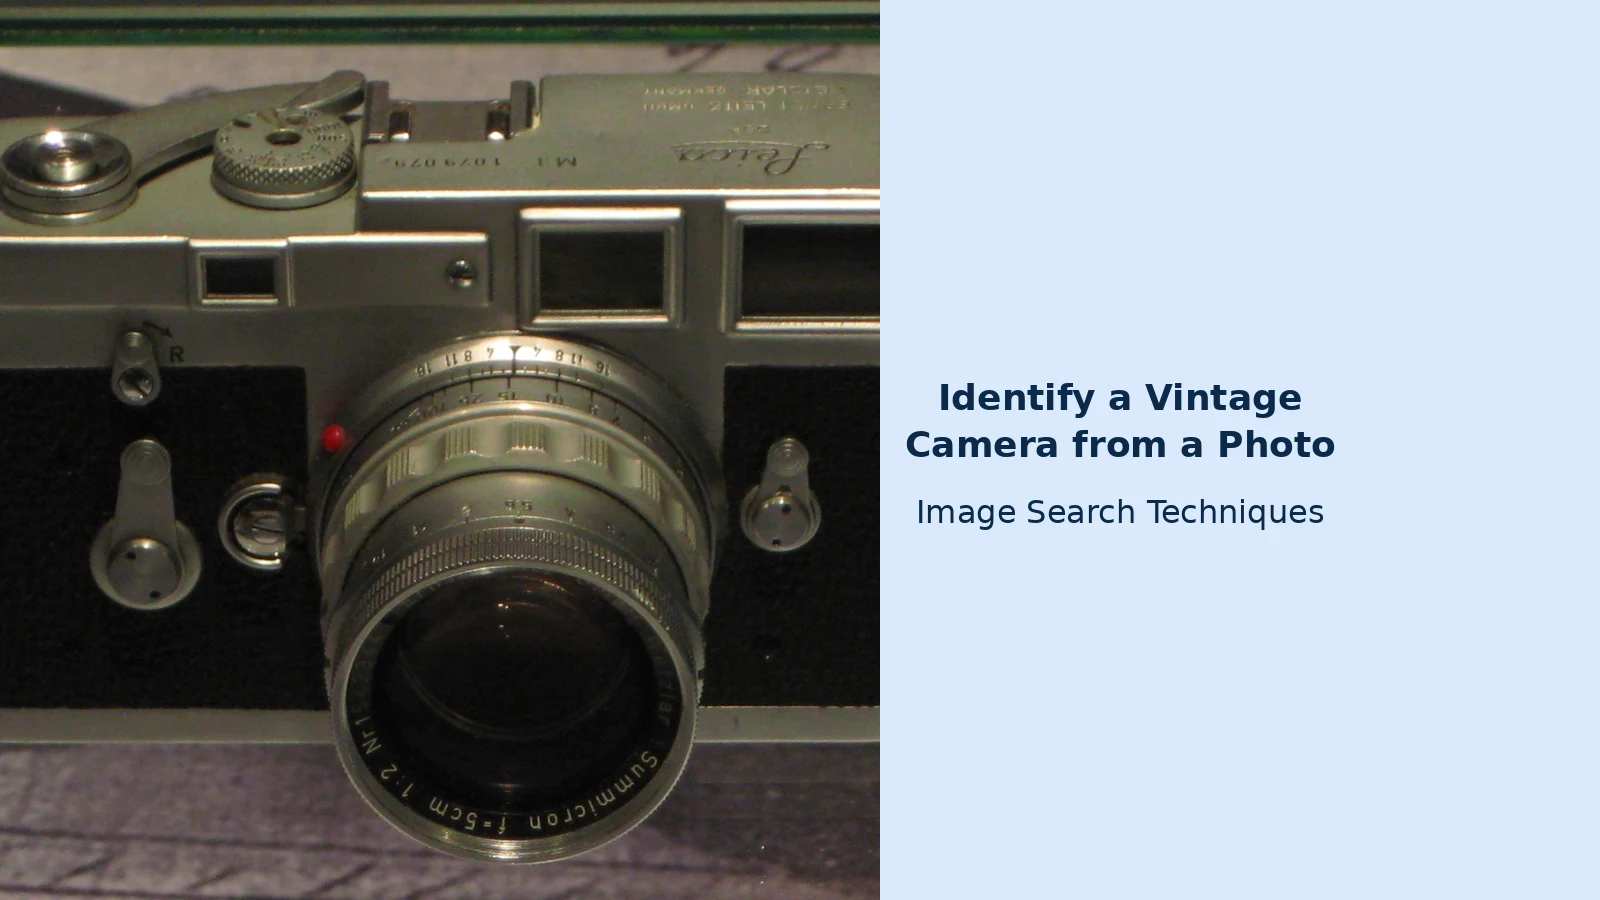
Identifying a vintage camera from a photo means naming the exact model and variant, dating it to a year or a narrow range, and confirming the parts in the picture belong together. A model name alone is rarely enough: a Leica M3 made in 1954 and one made in 1965 are the same model on paper, but they differ in details that matter to buyers.
A useful identification answers four questions, in this order:
- What model is it? The maker and model name, read from the engraving on the top plate or body front.
- When was it made? The year or production batch, worked out from the serial number.
- Which variant is it? The exact version, chrome or black paint, single or double stroke, which lens is fitted, where most of the value and most of the mistakes sit.
- Do the parts match? Whether the lens, body and accessories are the combination the maker actually sold, or a later assembly.
If you cannot answer the first two from the photo you have, you need better photos first: guessing from a blurry front view is how people buy the wrong camera.
Our guide to identifying vintage and thrift store finds from a photo covers the general approach; what follows is the detail that only applies to cameras, serial ranges, lens mounts, shutter types and finder framelines.
How do you read the top plate and lens ring in a photo?
Start with the top plate, because that is where makers put the two most useful facts: the model name and the serial number. On most 35mm rangefinders and SLRs, the model name is engraved near the accessory shoe and the serial sits beside it. On twin-lens reflex cameras such as the Rolleiflex 2.8F and 3.5F, the name is on the front panel and the serial is usually on the front or the focusing hood. On a Hasselblad 500C/M, the most-collected Hasselblad V-system body, the serial is on the rear of the body and the magazine.
Work through the photo in this order:
- Find the maker and model engraving. Zoom into the top plate and look for the brand and the model name or number next to it. If the engraving is unreadable, ask for a straight-on close-up, a photo taken at an angle will not do.
- Read the serial number digit by digit. Copy it exactly, including any letter prefix: a single misread digit can move a camera by a decade, because serial tables are organised in batches. If one digit is unclear, say so rather than guessing.
- Read the lens ring. The front ring carries the lens name, maximum aperture and focal length, for example, “Summicron 1:2/50” means a 50mm Summicron with a maximum aperture of f/2. The lens has its own serial number, usually on the front ring or barrel, and can be dated separately.
- Note the shutter and controls. A cloth focal-plane shutter, a leaf shutter, a self-timer lever, a film-advance lever and a rewind knob each narrow the model down.
- Check the mount. The lens mount, Leica M bayonet, Nikon F bayonet, M42 screw thread, is a strong clue: a lens that does not fit the body’s mount warns that parts have been swapped.
If the listing photo is a single front view taken from a distance, you will not be able to complete these steps, ask for the close-ups listed later in this guide instead.
How do you date a camera by its serial number?
You date a camera by its serial number by finding the production batch containing that number in the maker’s serial table, then reading off the year assigned to it. The table is the authority; the serial number alone tells you nothing until it is looked up.
Follow these steps:
- Copy the serial number exactly from the top plate, or from the body location the maker used for that model. Do not use a number from the lens, the lens serial dates the lens, not the body.
- Find the right serial table. Use a reference site publishing the maker’s own production records. For Leica, the Leica Wiki serial table on the L-Camera-Forum is the standard reference, and Camera-wiki is a reliable cross-check.
- Find the batch. Serial tables are organised in ranges: find the range containing your number and note the year it covers. A number near the edge of a range deserves a second look, because a misread digit would put it in the wrong batch.
- Cross-check with a physical detail. A dated feature should agree with the serial year: if the serial says 1960 but the camera has a feature from 1965, either the serial was misread or the camera has been rebuilt.
- Date the lens separately. Lens serial number dating works the same way, using the lens maker’s own tables. A lens made years after the body is not necessarily a problem, but a lens older than the body deserves a question.
The Leica M3 shows how this works, because its serial record is unusually complete. The Leica M3 was introduced in 1954, production ran to 1966, and over 220,000 were sold by the time it ended, according to Wikipedia’s Leica M3 article. Serial numbers started at 700,000 in 1954. The Leica Wiki serial table gives the batches: numbers 998,301 to 1,000,000 and 1,000,001 to 1,003,700 are 1960, and 1,022,001 to 1,022,700 is 1961. So a Leica serial number year lookup puts a Leica M3 numbered 1,009,4xx in the 1960 batch.
The M3 also shows why the cross-check matters. Early M3s had a double-stroke film advance, needing two strokes of the lever to wind on; the single-stroke advance replaced it from serial 919,251 in 1958, according to the Leica Wiki and Wikipedia. A camera with a 1956 serial number and a single-stroke lever has had its lever or top plate changed, not necessarily a fake, but not in its original state.
Not every maker kept records this tidy, some reused serial ranges, some published no tables, and some records were lost. When no serial table exists, date the camera from its features: shutter type, meter, finder design and lens mount together usually narrow production to a few years.
For a model reference alongside the serial table, the Camera-wiki page on the Leica M3 lists its defining features: a 35mm rangefinder with a Leica M bayonet mount, a 0.90× viewfinder with 50, 90 and 135mm framelines, a cloth focal-plane shutter from 1 second to 1/1000th of a second, and no built-in meter.
How do you pin down the exact model and variant?
You pin down the exact variant by comparing the small physical details in the photo against a reference description of the model, because makers changed details mid-production and those changes define the variant.
Start with the features that separate close relatives. The Leica M3 and the Leica M2 are a classic pair: the M3 has a 0.90× viewfinder with framelines for 50, 90 and 135mm lenses, while the M2, introduced in 1958, has a 0.72× finder with 35, 50 and 90mm framelines, according to Camera-wiki. A photograph showing the framelines through the viewfinder, or a seller who can name them, settles the question immediately. The same approach works elsewhere: the Nikon F, produced from 1959 to 1973 according to Estimonia, went through several prism changes, and the exact prism in the photo identifies the period.
Build a short variant checklist for the model you are identifying:
- Finish: chrome or black paint, and whether the black is original paint or a later repaint.
- Finder: magnification and framelines, where the photo or seller can show them.
- Film advance: single or double stroke, and whether the lever matches the serial year.
- Shutter: cloth focal-plane or leaf, and the fastest speed marked on the dial.
- Lens: the exact lens name, focal length and aperture from the lens ring, plus its own serial number.
- Markings: the wording and position of the engravings, which changed over production runs.
Use a camera-wiki model lookup for this step: search Camera-wiki for the model name and tick each feature off against the photo. Where Camera-wiki notes a mid-production change, check which side of it your camera falls on. This is the step the competitor’s value guide skips, it lists models and prices but does not teach you how to tell one variant from another, and the variant is where the money and the mistakes are.
The same discipline applies to other collectibles: our guide on how to identify a coin, stamp or collectible from a photo uses the same principle, read the markings first, then match the variant, then check value.
Which identification method should you use?
No single method is enough on its own: reverse image search catches stolen listing photos, serial-number lookup gives you a date, and reference-site matching confirms the variant. Use all three, in that order, and let each one check the others.
For the reverse image search step, start with Google Lens: upload the photo and it will show visually similar cameras and listings to compare against. And if you cannot upload a photo anywhere, describe the camera in words instead: its body shape, any brand or model name, the lens text and the film format. That is usually enough for someone who knows the line to narrow it down.
| Method | What it tells you | What it cannot tell you | Best for |
|---|---|---|---|
| Reverse image search | Whether the same photo appears elsewhere online | The model, year or condition of the camera | Spotting a stolen listing photo before you trust the seller |
| Serial-number lookup | The production year or batch, from the maker’s own records | Whether the serial was re-engraved or parts swapped | Dating the body and the lens to a year |
| Reference-site matching | The exact model and variant, from the specification | Whether this particular camera works or what it is worth | Confirming the variant and spotting mismatched parts |
| Asking the seller for more photos | The details the listing photo hides, engravings, shutter, interior | Anything, if the seller refuses or sends the same photo again | Closing the gaps the other three methods leave |
Run a reverse image search on the listing photo first, before spending time on the serial number. Upload the photo to the site’s free reverse image search tool and check whether the same image appears in other listings or under a different seller’s name. A photo that appears in five listings in three countries is a stolen image, and the camera in it may not exist at all.
Then do the serial lookup and the reference-site match. If the three methods agree, you have a solid identification; if they disagree, stop and work out why before going any further.
What extra photos should you ask a seller for before you buy?
Is this old camera worth buying? Photo checks are the only evidence you have before you pay. A seller who provides them willingly is a good sign; one who refuses or sends the same image cropped differently is a warning in itself. Ask for these, one at a time:
- Top plate, straight on. The model engraving and serial number, sharp and fully legible, taken from directly above rather than at an angle.
- Lens ring, straight on. The lens name, aperture and focal length, plus the lens serial number on the front ring or barrel.
- Front and back of the body. Both sides in daylight, showing the finish, vulcanite and any brassing or wear.
- Shutter curtains, with the back open. Ask for a photo of the curtains themselves, and look for wrinkles, pinholes, stains or replaced material.
- Inside the lens, with a light behind it. A photo looking through the lens towards a light shows fungus, haze and scratches a front view hides.
- The viewfinder. A photo through the finder showing which framelines appear, this settles M3 versus M2 and similar questions.
- The base plate and interior. The base, film chamber and battery compartment show corrosion and repair marks.
- Any damage, photographed honestly. Ask the seller to photograph every dent, scratch and mark, mentioned or not.
Use this list as your vintage camera identification checklist for every listing. A careful buyer asks for the same eight photos every time, and the pattern of answers, complete, partial, or refused, is the most reliable signal you will get.
Once you have the photos, run the value check honestly: a photo identification is not a valuation. Estimonia’s value guide puts most common consumer film cameras at roughly $20 to a few hundred dollars, with sought-after models, the Leica M3 and M6, the Rolleiflex 2.8F, the Hasselblad 500C/M and the Nikon SP, trading at about $1,000 to $9,000 in good condition. Those are the competitor’s aggregated ranges, not a price for the camera in front of you, condition and variant dominate the real figure. Check eBay sold listings for the exact variant, same model, same finish, same lens, in a similar condition. A clean photo pass is not proof of authenticity or working condition, and a single asking price is not evidence of value.
Watches are identified the same way, model, serial, variant, then value, and our guide on how to identify a watch from a photo follows the same sequence.
Watch for fakes and replica signs. Franken-cameras are assembled from mismatched parts, a top plate from one year, a body from another, a lens never sold with that model, and they are only visible if the serial year, features and lens all agree. Re-engraved serials are another warning: engraving that looks shallow, uneven or misaligned next to the factory lettering suggests the number was added later, possibly to make a common camera look like a rare early one. Repaints are sold as original black paint, but original paint shows brassing wear on the edges where the camera was handled, while a fresh repaint looks uniformly black and often covers engraving. Replaced vulcanite and replaced shutter curtains reduce value. No single sign proves a camera is fake, but two or three together should stop a purchase until the camera has been inspected in person by someone who knows the model.
Leica’s own press release records that the Leica 0-Series No. 105, a 1923 prototype that was Oskar Barnack’s own camera, sold for €14.4 million including buyer’s premium at the 40th Leitz Photographica Auction in Wetzlar on 11 June 2022, breaking the world record for the most expensive camera ever sold, according to Leica Camera’s own announcement. That figure belongs to a unique prototype, not to any camera in an ordinary listing.
Worked example: a chrome Leica M3 in a listing photo
This is an illustrative walkthrough, not a real listing: the serial number and details are invented to show how the steps fit together, and outcomes vary.
Imagine a listing photo showing a chrome Leica M3 fitted with a 50mm Summicron lens, well lit, with the serial number 1,009,4xx visible on the top plate. Here is the method applied, step by step.
- Read the top plate. The engraving reads “Leica M3” beside the accessory shoe, and the serial reads 1,009,4xx. The last two digits are partly hidden by glare, so they are recorded as unknown rather than guessed.
- Date the body by serial. In the Leica Wiki serial table, 1,009,4xx falls in the batch 1,007,001 to 1,011,000, which the table assigns to 1960, so the camera is a 1960 Leica M3, with the caution that the last two digits are unread.
- Confirm the model against the physical details. The photo shows a single-stroke film advance lever, correct for 1960: the single-stroke advance replaced the double-stroke from serial 919,251 in 1958. The seller’s viewfinder photo shows framelines for 50, 90 and 135mm lenses, matching the M3’s 0.90× finder and ruling out the M2, whose 0.72× finder shows 35, 50 and 90mm framelines. The cloth focal-plane shutter, Leica M bayonet mount and absence of a meter all agree with the Camera-wiki specification.
- Date the lens separately. The lens ring reads “Summicron 1:2/50”, a 50mm f/2 Summicron, and its serial dates it to the same period as the body.
- Reverse image search the listing photo. Running the photo through the site’s free reverse image search tool shows it appearing only in this seller’s listing, the expected result for a genuine seller’s own photograph.
- Ask for the extra photos. The seller provides the shutter curtains (clean, no pinholes), a look through the lens towards a light (clear, no fungus), and the base plate (light brassing, consistent with a used camera). Each answer matches the 1960 dating.
What is still not proven? A great deal. The photographs cannot prove the shutter speeds are accurate, a shutter can look clean and still run slow. They cannot prove there is no fungus deep inside the lens, or that the rangefinder is calibrated, or that the serial was not re-engraved. A photo pass can identify the camera and rule out the obvious problems; it cannot replace handling the camera and testing the shutter. Any listing that claims a photograph proves a camera “fully working” is overstating what a photo can show. The same badge-first, serial-second method works for instruments too: see how to identify a piano model from a photo, which shows why the fallboard name is only a lead and the plate serial number governs. Typewriters carry the same badge-plus-serial-number check as cameras: for the same method on a different machine, see how to identify a typewriter model from a photo, which works through the badge, the serial number under the ribbon cover and a live reverse search of an Olivetti Lettera 32.
FAQs
What film camera is this in my photo?
Read the model name and serial number on the top plate, then read the lens ring for the lens name and aperture. Match the serial against the maker’s serial table, and compare the body with a reference site such as Camera-wiki to confirm the model and variant. If the engraving is unreadable, ask the seller for a close-up.
How do I date a camera by its serial number?
Copy the serial number exactly from the top plate, then find the production batch that contains it in the maker’s serial table and read off the year. Cross-check the result against a physical feature, such as the film advance type, which should agree with the serial year. Date the lens separately, using the lens maker’s own table.
How do I identify a camera in a listing photo before buying it?
Start with a reverse image search to check the photo is the seller’s own, then read the top plate and lens ring, date the body by serial and confirm the variant against a reference site. Ask for close-ups of the shutter curtains, the inside of the lens and the base plate. A seller who provides them is a good sign.
Is this old camera worth buying based on the photos alone?
Photos can identify the camera and rule out obvious problems, but they cannot prove the shutter is accurate, the rangefinder is calibrated or the lens is free of internal fungus. Check sold listings for the exact variant before judging the price, and treat a photo pass as a reason to inspect the camera in person, not as proof it works.