🔎 Reverse Image Search
Image search techniques made simple: upload a photo or paste a URL and search 6 engines at once. 100% free, nothing stored.
🔒 Your image is never stored on our servers longer than 24 hours and is never shared.
Most photo credits you see online are wrong. They name the wrong person, link to the wrong page, or skip the licence entirely. A credit line that reads “Photo: Google” or “Source: Pinterest” tells the reader nothing, and it does nothing for the photographer either. The fix is simple once you know the pattern, and it takes less than a minute per photo once you have the habit.
The short answer: to credit a photo properly, name the photographer, give the photo’s title if it has one, link to where you found it, and name the licence you are using it under. That is the TASL method: Title, Author, Source, Licence. A credit line is not permission. You still need a licence or the photographer’s consent before you use the photo.
That last sentence matters more than the rest. This guide shows you how to build a credit line that actually works, how to find the photographer and the licence in the first place, where the credit goes on a blog, on social media and in a presentation, and the mistakes that make a credit useless. It is general information about how crediting works, not legal advice. If a photo is central to a commercial project and the licence is unclear, ask a lawyer before you publish.
What goes into a proper photo credit?
A proper credit answers four questions at a glance: what is the photo called, who made it, where did you find it, and what licence covers your use. Creative Commons calls this the TASL method, and it works well beyond Creative Commons photos as a general framework for any photo credit.
TASL stands for Title, Author, Source and Licence. It is the attribution framework Creative Commons recommends in its own guide to crediting licensed work. Every Creative Commons licence requires attribution, and TASL is how you do it.
Title. The name of the photo, if it has one. Many stock photos have no formal title, in which case you skip this element. Under Creative Commons licences version 3.0 and earlier, giving the title is a requirement. Under the 4.0 licences it is optional, but including it still helps the reader find the photo.
Author. The photographer’s name, or whoever the licensor says should be credited. Sometimes the licensor wants credit to go to an organisation, or to a pseudonym instead of a real name. In rare cases a licensor asks for no attribution at all. Do what the licensor asks, and use the name exactly as they give it. Do not swap in a different name, a username from another site, or the name of the site where you found the photo.
Source. A link to where the photo lives, so anyone can check the licence and find the original. Use the full original link rather than a shortened one, and link to the page where the photo was first published where you can. A search engine is not a source, and a bare link on its own is not a credit either. The source is one part of the credit, not the whole of it.
Licence. The specific licence that covers your use, named and linked to its terms. “CC BY 4.0” with a link to the licence deed is a complete licence element. “Creative Commons” on its own is not a licence at all. It is the name of an organisation, and there are six different Creative Commons licences with different conditions. Name the exact one.
There is no single legally mandated format for a credit line. What matters is that a reasonable reader can see who made the photo, where it came from, and what licence it is used under. Creative Commons puts it this way in its best practices for attribution: include all the relevant information the licensor supplied, link the elements where you can, and adapt the format to the medium you are publishing in.
One more element belongs in a full credit when the licence requires it. Under a Creative Commons licence you must also say whether you changed the photo, and you must not suggest the photographer endorses you or your use. A cropped photo credited as though it were untouched is a bad credit, and a credit that reads like an endorsement is worse.
How do you find the photographer and the licence first?
You cannot credit a photo you cannot trace. Most photos arrive on your screen stripped of their history: a friend sends one in a chat, a search result shows one with no author, a Pinterest pin carries no licence at all. The credit starts with finding the source, and the fastest way to do that is a reverse image search.
Answer capsule: reverse search the photo first, then read the licence on the page where the photo was first published. The search finds the source, and the source page names the photographer and the licence.
Run the photo through a reverse image search before you do anything else. Our own reverse image search tool checks six engines at once, which matters because no single engine finds every copy. Google Lens is usually best at naming a famous photo. TinEye is better at showing you the oldest copy, which is often the original. Sort TinEye results by oldest and the first result is frequently the photographer’s own page or the stock library that first published it.
Once you have the source page, read it properly. A Wikimedia Commons file page lists the author, the date, and the licence in one place. A stock library page lists its own licence terms. A photographer’s portfolio page may say “free to use with credit” or “all rights reserved, contact me for licensing”. What the source page says is what counts, not what the search result or the pin said.
Check the file’s own metadata too. Most digital photos carry EXIF data and IPTC metadata, and the IPTC fields are designed to hold the creator’s name, a copyright notice, and usage terms. You can read them in most photo software, or with a free metadata viewer online. Metadata helps, but it is not a substitute for the source page. Metadata gets stripped when a photo is re-uploaded, and a credit that lives only in the metadata is invisible to your readers. Creative Commons warns against putting attribution only in metadata or only in alt text for exactly that reason.
Pinterest deserves a special warning here. A pin is a copy, and Pinterest cannot tell you who owns the photo in it. Crediting “Pinterest” credits a platform, not a photographer. Reverse search the pin to find the original, then credit the creator. Our guide to using Pinterest images on a blog walks through the same trace, and the same rule applies here: find the source first, then build the credit.
If you want the full picture on keeping your own photos safe online, our complete guide to protecting your photos online covers watermarks, metadata, and what to do when someone uses your work without credit.
How do you build the credit line?
Once you have the four TASL elements, the credit writes itself. The format changes a little with the licence, so here is the builder for the three cases you will meet most often: a Creative Commons photo, a stock photo, and a public domain photo. The table shows what each element looks like in each case, and the worked examples below it use real photos, traced and credited exactly as the table says.
| TASL element | Creative Commons photo | Stock photo | Public domain photo |
|---|---|---|---|
| Title | Use the title from the source page. Required under CC 3.0 and earlier, optional under 4.0. | Use the title if the library gives one. Most stock photos have none, so skip it. | Use the title if one exists. No licence requires it, but it helps readers find the photo. |
| Author | The photographer’s name, exactly as the licensor gives it. Link to their profile page. | The photographer’s name as the library shows it. Link to their profile on the library. | The photographer if known. Credit is good practice even though no law requires it. |
| Source | Link to the photo page where you found it, ideally where it was first published. | Link to the photo page on the stock library. | Link to the archive or collection that holds the photo. |
| Licence | Name the exact licence and link to its deed, for example “CC BY-SA 3.0”. Note any changes you made. | Name the library’s licence, for example “Unsplash Licence”. Credit is usually optional, not required. | State “Public domain” and say why, for example the date or the government source. |
Answer capsule: build every credit from the same four parts, and let the licence decide which parts are required. A Creative Commons credit needs all four, a stock credit usually needs two, and a public domain credit is a courtesy with the reason stated.
Worked example 1: a Creative Commons photo
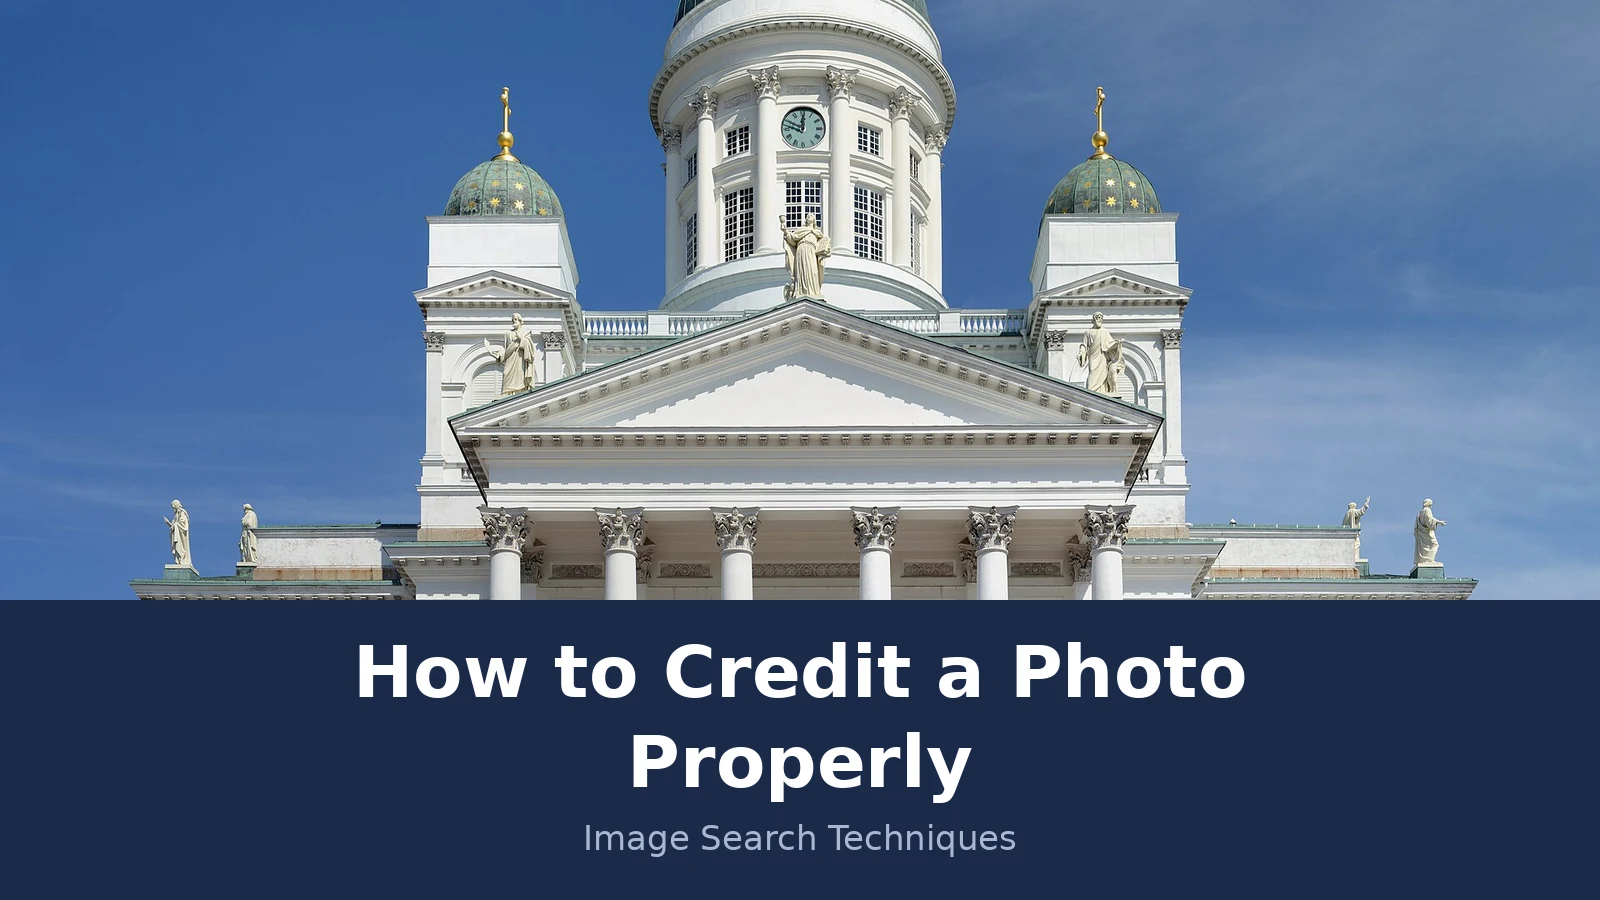
The photo at the top of this article is a real one: “The Lutheran Cathedral in Helsinki, Finland”, photographed by Alvesgaspar on 1 July 2013 and published on Wikimedia Commons under a Creative Commons Attribution-ShareAlike 3.0 licence. That licence requires attribution, and because it is a 3.0 licence the title is part of the required credit. The full credit line reads: “The Lutheran Cathedral in Helsinki, Finland” by Alvesgaspar, licensed under CC BY-SA 3.0. On the page, each element links to its target: the title to the Commons file page, the author’s name to their Commons profile, and the licence name to the CC BY-SA 3.0 deed.
We reverse searched this photo before writing the credit, to check that the Commons page really is the source and that the photo is not circulating under a different name somewhere else. TinEye, searching the 1280 pixel version of the photo because the full size file was too large for its URL upload, found 262 matches across 86.7 billion images. The top three results were sponsored stock listings selling similar cathedral photos, not this one. The first genuine match was the Wikipedia file page for this exact photo, dated 7 November 2016. The earliest dated entry, a Flickr photo from June 2009, is a different shot of the same cathedral, taken before this photo existed, which is a useful warning: TinEye matches similar images as well as exact ones, so read the dates. Google Lens identified the building as Helsinki Cathedral and put the same Wikipedia file page first among its visual matches. Lens showed no total count, so none is reported here. The search confirmed what the Commons page says: this is the Alvesgaspar photo, it is widely reused, and the Commons file page is its source.
The ShareAlike part matters too. If you crop or recolour this photo, your version must carry the same CC BY-SA 3.0 licence, and your credit must say what you changed. A credit that hides the change breaks the licence, even if the name and the link are right.
Worked example 2: a stock photo
Take a portrait from Unsplash, “Man in black crew neck shirt” by Vicky Hladynets, published 23 July 2020. Unsplash photos come under the Unsplash Licence, which lets you use them free for commercial and non-commercial purposes without asking permission and without crediting anyone. So no credit is legally required here. Good practice still says credit the photographer, because it costs nothing and it is how photographers get found. The credit reads: “Photo by Vicky Hladynets on Unsplash”, with the name linked to the photo page. That is the whole credit. There is no title to give, because Unsplash does not give the photo a formal title, and no licence deed to link, because the Unsplash Licence is a single page of terms rather than a versioned licence.
The difference from the first example is the point. The same “Photo by” format is a legal requirement for the cathedral photo and a courtesy for the portrait. The credit looks similar on the page, but the obligation behind it is different, and that is why the licence element belongs in the credit. A reader who sees “CC BY-SA 3.0” knows the rules. A reader who sees nothing knows nothing.
Worked example 3: a public domain photo
Earthrise, the photograph of the Earth rising over the Moon’s horizon, was taken by Apollo 8 astronaut Bill Anders on 24 December 1968. It is a NASA image, and NASA images are in the public domain in the United States. No licence requires a credit, and no one can sue you for using it without one. The credit still reads: “Earthrise, photographed by Bill Anders (NASA), 24 December 1968. Public domain.” The date and the NASA source are doing real work here. They tell the reader why the photo is free to use, which is exactly the information a reader needs when they want to use it themselves.
Not every old photo is public domain, and the date is what decides it. In the United States, published works from before 1931 are in the public domain as of 2026, because copyright in published works lasts 95 years. A photo published in 1935 is not free yet. If you are not sure whether a photo is out of copyright, our guide to telling whether a photo is public domain walks through the date checks, the photographer’s death date, and the government-works rule.
Where should the credit go?
A credit that nobody can find is barely a credit at all. The rule is simple: put it where the reader sees the photo, not in a list at the bottom of the page that nobody opens. The exact spot depends on the medium, so here is the placement advice in full, medium by medium.
Answer capsule: put the credit next to the photo, in the caption or directly beneath it, wherever the photo appears. Only use a credits list at the end of the page when the photo has no caption at all.
On a blog or website, put the credit at the end of the image caption, directly under the photo. Link the photographer’s name to their portfolio or to the photo page, and link the licence name to its deed. If the photo is a hero image or sits in a grid with no caption, put the credit in a photo sources list at the end of the article, and say which photo each line refers to. Never bury a required credit in a page footer three screens below the photo.
On social media, tag the photographer’s handle in the photo itself and name them in the caption, for example “Photo: @username” or “Photo by @username”. Tags alone are not enough, because a tag breaks if the photographer changes their username or deletes their account. The name in the caption text survives. The same applies on Facebook, Instagram, LinkedIn and X. Even in a casual group post, credit the creator. It costs one line, and it is the difference between sharing a photo and taking it.
In a presentation or a video, put a small credit line in the bottom right corner of the slide, around 9 point type, or in the speaker notes if the slide is too busy. For a video, add a dedicated credits list at the end, with one line per photo. A credit that flashes past for half a second at the end of a video is not a credit. Give the list enough screen time to read.
In academic or formal writing, follow the citation style your institution uses. Under MLA style, a publicly accessible online photo gets a Works Cited entry with the author, the image title, the container or source, the publication date, and the URL. For a figure embedded in the text, put an identifying label and a caption directly beneath the image as well. Other styles differ in the order of the elements, but they all want the same four facts: who made it, what it is called, where it came from, and when it was published.
Two places never count as the credit on their own. Do not put the credit only in the image’s alt text. Alt text is for screen readers, and a sighted reader never sees it. Do not put it only in the file’s metadata either. Metadata travels with the file, which is useful, but your readers do not open the metadata. Embed the credit in IPTC or XMP metadata as well as in the visible caption, so the credit survives if the photo is downloaded and reused, but never instead of the visible credit.
What are the most common photo credit mistakes?
Most bad credits fail in the same few ways. Check your credit against this list before you publish, because every item on it is a mistake we see on real blogs every week.
| The mistake | Why it fails | What to write instead |
|---|---|---|
| “Photo: Wikipedia” | Wikipedia is not the photographer. It is a website that hosts other people’s photos. | Credit the actual author named on the file page, and the licence the file carries. |
| “Photo: Google” or “Source: Pinterest” | A search engine and a pin board are not authors, and neither one owns the photo. | Reverse search to the original, then credit the creator and link to the original page. |
| “Photo: Creative Commons” | Creative Commons is an organisation, not a photographer, and not a licence. | Name the photographer and the exact licence, for example “CC BY 4.0”. |
| A bare URL with no name | A link is not a credit. Nobody can tell who made the photo from a web address alone. | Put the photographer’s name next to the link, plus the title and licence. |
| Crediting the site you found it on | The site that hosts a copy is rarely the creator. Wikimedia Commons owns almost none of the photos it hosts. | Credit the author named on the file page, not the site that hosts the file. |
| Crediting the wrong person | Using the uploader’s name, a model’s name, or a different photographer’s name is worse than no credit. | Use the name the licensor gives, exactly as given, and check it on the source page. |
| No licence named | Without the licence, the reader cannot tell whether they may reuse the photo. | Name the exact licence and link to its deed, for example “CC BY-SA 3.0”. |
| Credit hidden in alt text or metadata only | Readers never see alt text or metadata, so the credit is invisible where it matters. | Put the credit in the visible caption, and keep the metadata copy as a backup. |
| Removing a watermark | A watermark is part of the photographer’s credit. Removing it hides the author and can breach the licence. | Leave watermarks and embedded signatures intact, and add your own credit beside them. |
| No note of changes | A cropped or recoloured photo credited as untouched misleads the reader and breaks a CC licence. | Add “Cropped from original” or describe the change in the credit line. |
Answer capsule: the most common mistakes all come from crediting the wrong thing, the place you found the photo instead of the person who made it. Check the name, the licence and the changes, and the credit is right.
The “Photo: Wikipedia” mistake is worth a paragraph of its own, because it is so common. Wikipedia images each carry their own licence, and the file page names the photographer. Crediting Wikipedia tells the reader nothing about who made the photo or what licence it is under. Our guide to using Wikipedia images on a blog gives the correct credit line for each licence type, and the rule is the same every time: credit the author, not the site.
Does crediting a photo give you permission to use it?
No. This is the single most important point in this guide, and the one most people get wrong. A credit line tells readers who made the photo. Permission is a separate question, and it comes from the photographer, from a licence, or in narrow cases from an exception in copyright law. Naming the photographer does not create permission, and a perfect credit line does not protect you if you never had the right to use the photo.
Answer capsule: credit is not permission. Get the licence or the photographer’s consent first, then write the credit. A perfect credit on an unlicensed photo is still an infringement.
Copyright starts the moment a photo is taken. The photographer owns it whether or not they registered it, whether or not it carries a copyright symbol, and whether or not it has a watermark. In the United States, using a photo without permission can lead to statutory damages of $750 to $30,000 per work, and up to $150,000 per work if the infringement was wilful, under 17 U.S.C. s. 504(c). Those figures are the law, not a scare story, and a credit line does not reduce them. A photographer can also send a takedown notice and have the photo removed from your site. In the United Kingdom, the position is similar in outline: copyright is automatic, and using a photo without permission or an exception is an infringement.
Plagiarism and infringement are not the same thing, and confusing them is part of the problem. Plagiarism is passing off someone else’s work as your own, which is an ethical and academic offence. Infringement is using someone else’s work without permission, which is a legal one. You can infringe without plagiarising, by crediting the photographer perfectly while using their photo without a licence. You can plagiarise without infringing, by claiming a public domain photo as your own work. A credit line fixes the plagiarism. It does nothing about the infringement.
Fair use in the United States and fair dealing in the United Kingdom are different doctrines, and neither one is a permission slip. Our guide to fair use images on your blog explains the four-factor test in full, with a worked example. Fair use is decided case by case under four factors in 17 U.S.C. s. 107, and only a court can decide it. The U.S. Copyright Office explains the four factors on its fair use page, and the Copyright Office itself says there is no formula for a safe amount. UK fair dealing is narrower. It covers specific purposes such as criticism, review, quotation, and non-commercial research, and it is judged on the facts of each case. Using a whole stock photo as a decorative blog header almost never qualifies under either doctrine, because it does the same job the licence was sold for. If you cannot find the owner or the licence, do not assume fair use covers you. Find a different photo.
That is why the order of work matters. First, find the photo’s source with a reverse image search. Second, read the licence on the source page. Third, check whether the licence covers your use. Only then write the credit. If the photo is all rights reserved and you have no permission, the correct credit line is no credit line at all, because the photo should not be on your page. Our guide to using images from Google on a blog walks through the same order, because finding a photo on Google Images is not a licence either.
What if you cropped the photo, or cannot find the photographer?
Two situations trip people up after they have the basics right: the photo they edited, and the photo nobody can trace. Both have clear answers.
Answer capsule: if you changed the photo, say so in the credit. If you cannot find the photographer, do not use the photo, because no tool can invent a name that was never attached to it.
If you cropped or edited the photo, note the change in the credit line. A simple crop or a resize is a mechanical change, and “Cropped from original” is enough. A creative change, one that alters what the photo means, makes the result an adaptation. Under a Creative Commons licence that allows adaptations, you must still credit the original and say what you changed. Under a licence with a NoDerivatives condition, such as CC BY-ND, you cannot publish the adaptation at all. The ShareAlike licences add one more condition: your adapted version must carry the same licence as the original.
If the photo was made with AI, the credit rules are still settling. The U.S. Copyright Office position is that only human creativity is copyrightable, which means a purely AI-generated image has no human author to credit. There is no universal standard for crediting AI images yet. The honest approach is to name the tool and your own role, for example “Image made with Canva AI, edited by the author”. Do not present an AI image as a photograph, and do not credit a real photographer for an image no human took.
If you cannot find the photographer at all, say so plainly and act on it. Reverse search the photo across several engines, check the metadata of every copy you can find, and ask the site or person who published it. If the image never circulated with a name attached, no tool can invent one. That photo is an orphan work in practice, and using it without a licence is a risk, not a right. The safe choices are to use a different photo with a clear licence, to buy a licence from a stock library, or to ask the publisher for the photographer’s details and wait for an answer. “Credit: unknown” is not a credit, and it does not protect you.
One last point, for photographers rather than users. In the United States, the Visual Artists Rights Act gives attribution and integrity rights to the authors of qualifying visual art, such as a single copy or a limited edition of 200 or fewer signed and numbered copies. It does not cover ordinary commercial photography. Your protection as a photographer is the copyright itself, plus the credit line your licence requires. Make the credit easy to keep: put your name in the metadata, publish under a clear licence, and ask for the credit format you want on the page where the photo is first published.
Do I need to credit a photo I found on Google Images?
Yes, if the licence requires it, but get the licence first. Finding a photo on Google Images gives you no right to use it. Reverse search the photo to its source, read the licence on the source page, and credit the photographer, the title, the source and the licence. If the photo is all rights reserved, do not use it.
Is “Photo: Google” a proper credit?
No. Google is a search engine, not a photographer, and it owns none of the photos in its results. The same applies to Pinterest, which only hosts copies uploaded by other people. Credit the person who took the photo, and link to the page where the photo was first published, not to the search result.
Do I have to credit a public domain photo?
No, there is no legal duty to credit a public domain photo, because no one owns the copyright any more. It is still good practice to name the photographer and say why the photo is free, for example the date it was published or the government archive it came from. That helps your readers reuse it with confidence.
Do I need to credit a photo from Unsplash or Pexels?
No. The Unsplash Licence and the Pexels licence both let you use photos without crediting anyone, for commercial and non-commercial purposes. Crediting the photographer is still good practice, because it costs one line and it helps photographers get found. A simple “Photo by Name on Unsplash” is enough.
What happens if I use a photo without permission but credit the photographer?
You can still be liable for copyright infringement. A credit line is not permission, and it does not reduce the damages a court can award. In the United States, statutory damages run from 750 to 30,000 dollars per work, and up to 150,000 dollars if the infringement was wilful. The photographer can also have the photo taken down.
How do I credit a photo on Instagram?
Tag the photographer’s handle in the photo itself, and write their name in the caption, for example “Photo by @username”. Do not rely on the tag alone, because it breaks if the photographer changes their username. Put the name in the caption text as well, and add the licence if the photo is Creative Commons.