🔎 Reverse Image Search
Image search techniques made simple: upload a photo or paste a URL and search 6 engines at once. 100% free, nothing stored.
🔒 Your image is never stored on our servers longer than 24 hours and is never shared.
Baby passport photo rules are the part of a child passport application that catches most parents out. The photo looks simple, the rules look simple, and then the online check rejects the picture you spent twenty minutes taking. The reason is usually not the camera. It is the age band. The rules relax twice in a child’s life, at age 1 and at age 6, and a photo that passes at 11 months can fail at 13 months.
Direct answer: Baby passport photo rules relax by age. Under 1, your baby need not have their eyes open and can be photographed lying on a plain sheet from above. Under 6, your child need not look at the camera or hold a plain expression. From 6, the full adult standard applies. The size, background and freshness rules never change.
The age bands, in one sentence: HM Passport Office applies three different sets of pose rules to children, under 1, ages 1 to 5, and age 6 and over, while the size, background, freshness and file rules stay identical at every age. Everything in this guide comes from GOV.UK and HM Passport Office’s own examiner guidance, version 51.0, checked on the day of writing.
What are the baby passport photo rules?
GOV.UK states the child rules in a few short lines, and they are worth quoting exactly, because most of the confusion comes from people reading the adult rules and assuming they apply to children. The GOV.UK page says: “Children must be on their own in the picture. Babies must not be holding toys or using dummies. Children under 6 do not have to be looking directly at the camera or have a plain expression. Children under one do not have to have their eyes open. You can support their head with your hand, but your hand must not be visible in the photo. Children under one should lie on a plain light-coloured sheet. Take the photo from above.”
That paragraph is the whole system. Two birthdays switch the pose rules off and on. Nothing else changes. The table below is the Ranking Asset for this article: the three age bands side by side, so you can check your child’s band at a glance.
| Requirement | Under 1 | Ages 1 to 5 | Age 6 and over |
|---|---|---|---|
| Eyes open | Not required | Required | Required |
| Looking at the camera | Not required | Not required | Required |
| Plain expression, mouth closed | Not required | Not required | Required |
| Head square and level | Not required | Required in practice | Required |
| May lie on a sheet, shot from above | Yes, recommended | No | No |
| Supporting hand allowed | Yes, if not visible | No | No |
| Alone in the frame | Required | Required | Required |
| No toys or dummies | Required | Required | Required |
| Plain light background | Required | Required | Required |
| Head 29 to 34mm crown to chin | Required | Required | Required |
| No shadows, no red eye | Required | Required | Required |
| Photo taken in the last month | Required | Required | Required |
One row in that table needs a note. “Head square and level” is listed as not required under 1, because a baby lying on a sheet cannot hold its head level, and the examiner guidance accepts that. From age 1, the head still has to be upright and facing forward, even though the gaze and expression rules are waived. A toddler looking at the ceiling is fine. A toddler with their head tipped hard to one side is not, because HM Passport Office’s examiner guidance rejects photos where the head is tilted backward, forward or to the side.
The examiner guidance behind the customer rules is longer and more forgiving than most parents realise. It tells examiners they may accept a photo of a child under 6 where both eyes are not open, where a child wears a permanent or long-term eye patch, where a child does not have a neutral expression, where a child does not have their mouth closed, and where a child is not looking directly at the camera. It then states that children over 6 must meet the adult standards. That is the whole waiver list, and it is the reason so many parents reject perfectly good photos of their own children. If your two-year-old is mid-laugh and looking at the ceiling, the photo can still pass.
How do you photograph a baby under 1?
The under-1 band is the easiest to photograph and the easiest to get wrong, because parents try to sit the baby up. Do not. GOV.UK recommends the overhead method: lay the baby on a plain light-coloured sheet and take the photo from directly above. A baby lying flat cannot fall, cannot crawl out of frame, and cannot be distracted by the room. The sheet does the work of the background.
Here is the room-setup shot list for the under-1 overhead method, the second Ranking Asset in this article. Set it up before you pick the baby up.
- Pick the sheet first. A plain white, cream or pale grey flat sheet, ironed or pulled tight so there are no folds or creases. A patterned cot sheet will fail. A white towel works if it is big enough to fill the whole frame, but a sheet is easier to keep flat.
- Lay the sheet on the floor, not the bed. A bed is too soft and too high. The floor gives you a flat surface and lets you stand over the baby safely. Put the sheet near a large window for soft daylight.
- Light it from the side, never from above your head. Stand so the window light falls across the sheet, not straight down onto it. Overhead room lights throw a shadow of your phone and your body onto the baby. If the room is dim, wait for daylight rather than switching on a harsh ceiling light.
- Lay the baby on their back, head towards the window. Their face should be fully lit with no shadow across it. Tuck the sheet around them loosely so the edges of the frame are all sheet, with nothing else showing.
- Support the head from underneath, not from the side. You may support your baby’s head with your hand, but your hand must not be visible in the photo. Slide your hand flat under the sheet at the back of the head, or have a second adult hold the head steady from below the frame edge. A hand creeping in from the side is the most common under-1 rejection.
- Stand directly above and shoot straight down. Hold the phone with both hands, directly over the baby’s face, and check the screen before you shoot. The head should sit in the centre of the frame with space above it. Take the photo in portrait orientation, because the digital file must be at least 600 pixels wide and 750 tall.
- Use burst mode and take thirty frames. Hold the shutter down and keep shooting while the baby moves. One frame will have the eyes open, the head straight and the mouth in a natural position. Do not try to catch a single perfect shot. It wastes the baby’s patience.
- Check at full size before you submit. Zoom in on the best frame on the phone. Look for a hand at the edge, a fold in the sheet, a shadow across the face, or a dummy that slipped back into shot. Half of these are invisible on a small preview and obvious at full size.
Two practical points make the session easier. First, time it after a feed and a nap, not before. A settled baby gives you ten calm minutes. A hungry baby gives you none. Second, bring a second adult. One person manages the baby and the sheet, the other holds the phone and watches the frame. The second adult also gives you a voice to hold the baby’s attention, which matters more than any toy, because a toy in the frame is a rejection.
Do not use a car seat, a bouncer or a baby chair for the photo. They put straps, buckles and fabric into the frame, and they tilt the head back. The sheet on the floor is the method GOV.UK describes, and it is the method that fails least often.
Why is age 1 to 5 the hardest band?
A newborn can be laid down and photographed at leisure. A six-year-old can be asked to sit still and look at the lens. A toddler can do neither, and the rules for this band are the least forgiving in practice, because the eyes must be open while nothing else is required. Parents spend twenty minutes trying to get a two-year-old to hold a neutral face. They do not need one. The child can be mid-laugh, mid-yawn or mid-scowl, and looking at the ceiling. What they cannot do is have their eyes shut.
That is the key to this band. Stop chasing a neutral expression and chase open eyes instead. Everything else is a framing problem, and framing is the part you can control.
Stand the child against a plain wall, roughly a metre clear of it. The gap kills the shadow on the wall behind them. A white or pale cream wall is ideal. A patterned wallpaper will fail, and so will a wall with pictures, switches or a skirting board in shot. If the only plain wall is in a hallway, use the hallway.
Get down to their eye height. Shooting down at a child produces a tilted-back head and a distorted face, and the examiner guidance rejects a head tilted backward. Kneel, sit on the floor, or put the child on a chair so their face is level with your phone. Then prop the phone and stand directly behind it. A child follows the person, not the lens, so if you stand beside the camera their eyes go with you, and their head turns with their eyes. A turned head is a rejection even when the gaze rule is waived.
Have a second adult stand directly behind you to hold the child’s attention. Behind you, not beside you, for the same reason. That adult can talk, sing or make a noise. Do not use a toy to get their attention if it will end up in shot. The no-toys rule is absolute, and a toy held at the camera is in the frame more often than parents expect. If you need a distraction, hold it behind the phone, out of the picture.
Turn the flash off. Children blink at flashes, and red eye is an explicit rejection ground. The examiner guidance instructs staff to reject the photo if red eye shows on the paper photos or on screen. Daylight from a window is enough. If the room is too dark, move closer to the window rather than switching the flash on.
Use burst mode, keep the sessions short, and take breaks. Three attempts of two minutes beat one attempt of ten minutes. A tired toddler’s photos get worse, not better, as the session goes on. Take thirty frames, pick the one where the eyes are open and the head is level, and stop. You do not need a beautiful photo. You need a compliant one.
Hair is the quiet failure in this band. The rule is that the photo must not have hair in front of your eyes. A fringe that reaches the eyebrows is fine. One that reaches the eyelashes is not. Tie long hair back before you start, and check the eyes at full size. Half-closed eyes are almost invisible on a phone preview and obvious at full resolution.
What changes when your child turns 6?
From a child’s sixth birthday, every relaxation ends. They must look straight down the lens, hold a plain expression with their mouth closed, and keep their head square and level. The under-6 waivers in the examiner guidance stop applying, and the adult standard applies in full.
Two things make this easier than it sounds. First, explain why. Older children respond well to being told this is their official face for the border computer, so it needs to be their normal face, not a funny one. Framing it as a technical task rather than a photo shoot removes most of the performing. Second, watch for the suppressed smile. A six-year-old told not to smile will produce either a smirk or a grimace, and the guidance rejects smiling widely, pouting and frowning. Let them get the silly one out of their system first, take a few frames, then shoot immediately after they relax.
The practical method is the same as for a toddler, with one change. Give them a target. “Look at the little circle on the front” works better than “look at the camera”, which is a large ambiguous object. Prop the phone, stand directly behind it, use burst mode, and check the eyes at full size. A child of six can usually hold still for the thirty seconds this takes.
One more thing changes at 6, and it is not a photo rule. The same photo standard applies to a provisional driving licence photo, but a child cannot apply for a provisional licence until shortly before their 16th birthday, by which point the full adult standard applies anyway. Do not reuse a child’s passport photo for a licence application. Take a fresh one. For the adult side of the same standard, our DVLA driving licence photo rules explain the licence spec and the renewal routes.
What changed in December 2025?
This is the section most guides written before Christmas get wrong, and it is the main reason this article exists. HM Passport Office changed how it treats children’s photos in December 2025, and older advice still circulates as if nothing happened.
Until late 2025, HMPO tolerated a thin white, grey or black bar across the bottom of some children’s photos, provided it did not cover the face. That exception ended on 8 December 2025. Examiners are now instructed to reject any photo containing a white, grey or black bar and to ask for a fresh photo. The casework guidance behind this change was last updated on 4 March 2026, and it is version 51.0. If you are reusing an older booth photo for a child’s application, check it has no bar of any kind before you submit. A bar that was fine in November 2025 is a rejection now.
The same December 2025 update changed how examiners handle a visible supporting hand or arm. The customer rules still say you may support a baby’s head with your hand, as long as the hand is not visible. What changed is what happens when the hand is visible. The photo is no longer a simple rejection. It is referred to the Exceptions Handling Team, which means a longer wait and a human decision instead of a quick retake request. The practical lesson is the same as it always was, keep the hand out of the frame, but the cost of getting it wrong has gone up.
The third December 2025 change is about recency. A child’s photo has a shorter shelf life than an adult’s once HM Passport Office has received it. The examiner guidance gives a child’s photo a 6-month shelf life, against 12 months for an adult. The photo must still have been taken in the last month when you submit it. The 6-month figure is about how long HMPO will keep using the photo it already holds, for example if an application is delayed. If your application drags on past six months, expect to be asked for a fresh photo of your child, because a child’s face changes fast.
Glasses are worth a line here because tool-selling sites keep repeating a ban that does not exist in the form they state it. GOV.UK says do not wear glasses in your photo unless you have to do so. If you must wear them, they cannot be sunglasses or tinted glasses, and your eyes must not be covered by the frames or by any glare, reflection or shadow. For a child who needs glasses to see, that is the rule. There is no blanket ban in the official guidance.
What file and size rules apply to a child’s passport photo?
The pose rules change by age. The file rules do not. They are identical for a newborn and for an adult, and they are the rules that catch parents who took a lovely photo and then find the file itself is wrong.
| Rule | Digital photo (online application) | Printed photo (paper form) |
|---|---|---|
| Size | At least 600 pixels wide and 750 tall | 45mm high by 35mm wide |
| File size | At least 50KB and no more than 10MB | Not applicable |
| Head size | Must fill the frame as cropped by the service | 29mm to 34mm, crown to chin |
| Background | Plain light colour | Plain cream or light grey |
| Format | Colour, unaltered by software | Colour, on plain white photographic paper, no border |
| How many | One file, uploaded during the application | Two identical photos |
| Age of photo | Taken in the last month | Taken in the last month |
For an online application, do not crop the photo yourself. GOV.UK’s photo rules say to include your child’s head, shoulders and upper body, and not to crop the photo, because the service crops it for you. Schengen visas work the same way with different numbers: our Schengen visa photo requirements set out the 32 to 36 mm head rule for a 35 by 45 mm print. Cropping it yourself is how parents cut the head too small or lose the shoulders, and then the file fails the size check even though the picture looked right.
Watch the file size as well as the pixel size. A phone photo straight from the camera is usually several megabytes, which is fine, but a photo that has been sent through a messaging app is often compressed below 50KB, and a photo that has been through an editing app may have been saved as a different format. Check the file before you upload it. On most phones, the photo details screen shows the pixel size and the file size. If the file is under 50KB, go back to the original.
You can also get a digital photo from a photo booth or a shop before you apply. Choose the option to get a code with your photos, and enter the code during your application. GOV.UK says photos from a booth or shop are more likely to be approved than a photo taken using your own device. For a child old enough to sit still, a booth is quick and adequate. For a baby or a toddler, the balance tips the other way, and the next section explains why.
Worked example: I checked a real baby photo against the rules
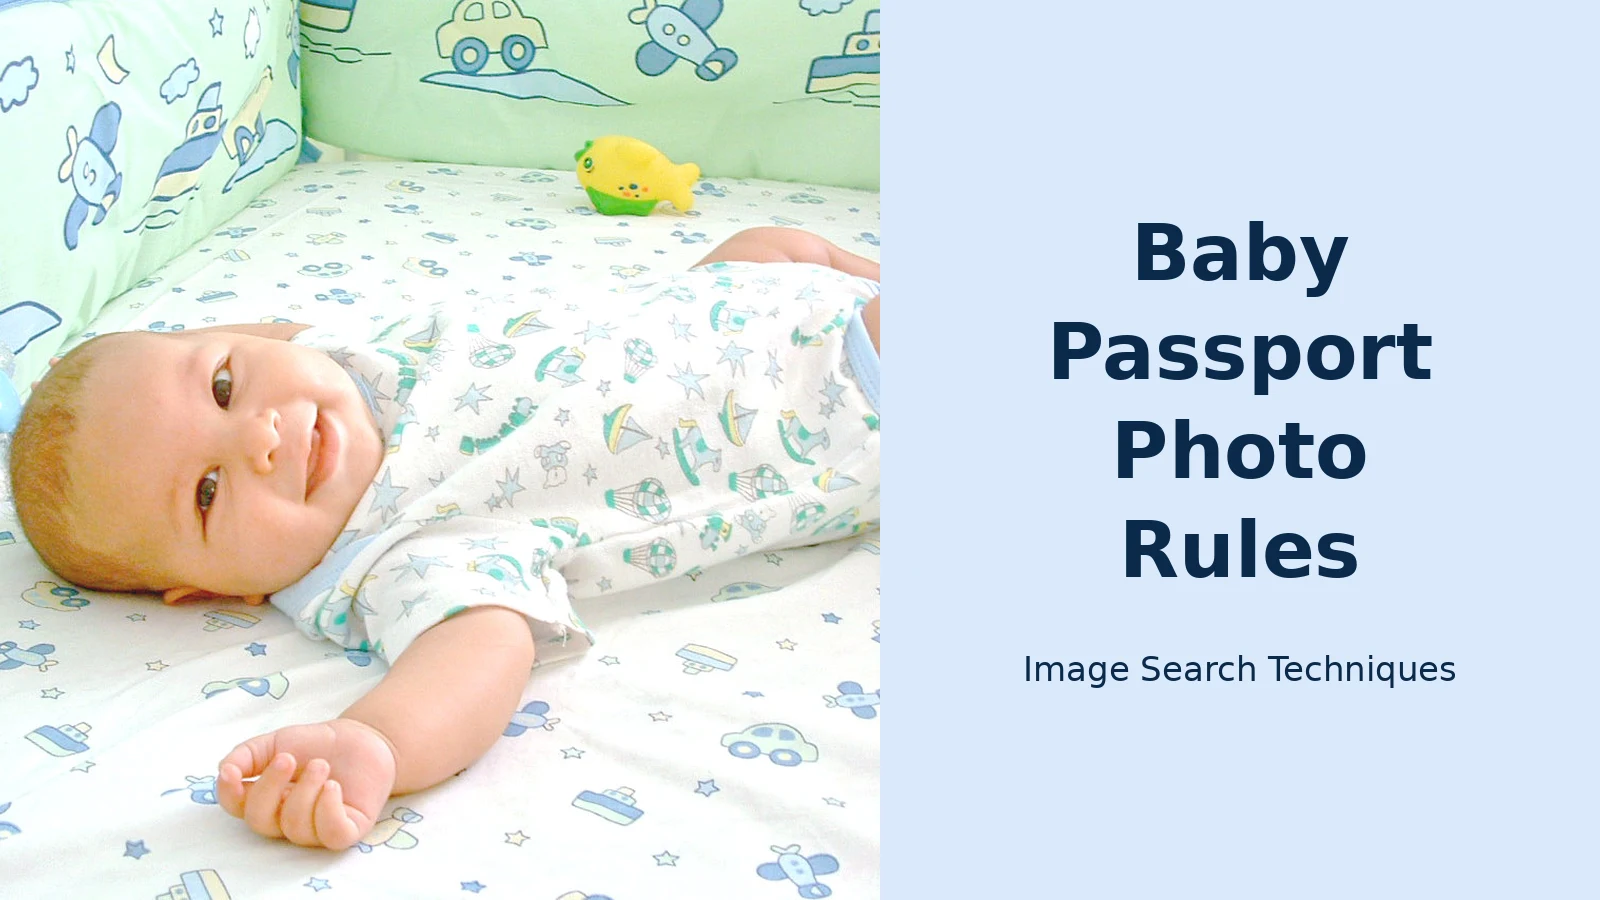
Advice is easy to write. Checking a real photo against the rules is the part that shows where the rules actually bite, so I did it with a real file. The photo is “Baby.jpg” from Wikimedia Commons, a smiling baby lying in a soft cot, taken on 27 August 2004 by Carin Araujo. The copyright holder allows anyone to use it for any purpose, including commercial use, which is why I could use it here. It is a warm, natural baby photo. It is also a terrible passport photo, and measuring it shows why.
First, the file itself. I downloaded the original and measured it on 13 November 2026. It is a JPEG, 1,280 by 854 pixels, and 262,307 bytes, about 256KB. Against GOV.UK’s digital rules, it passes the pixel floor, because both dimensions are above 600 by 750, and it passes the file-size band, because 256KB sits between 50KB and 10MB. That is where the good news ends.
It fails on orientation. The file is landscape, wider than it is tall, and a passport photo must be portrait. It fails on background, because the cot is patterned and textured, not a plain light colour. It fails on expression, because the baby is smiling with the mouth open. And it fails on freshness, because the photo was taken in 2004 and a passport photo must have been taken in the last month. A photo can pass every file rule and still be useless as a passport photo, because the file rules are only half the standard.
Then I ran the same photo through our own free reverse image search tool, to check what the web knows about it. A passport photo has to be a fresh photo of your child, not a picture downloaded from the internet, and a reverse search is the fastest way to tell the difference.
I pasted the photo’s URL into the tool on 13 November 2026. It accepted the URL and showed the preview “Baby.jpg, Dimensions: 1280 x 854 px”. The “Search All” button opened only one tab, Google Lens, so I ran the other engines one by one. No CAPTCHA appeared on any engine.
Google Lens worked. It identified the photo as a smiling baby lying in a crib, and its Exact matches view returned a long list of exact 1,280 by 854 copies, including the Baby.jpg file pages on many Wikipedia language editions, plus Baby on Simple English Wikipedia and Infant on Wikipedia as top visual matches. The English Commons file page itself did not appear among the visible top results.
Bing Visual Search worked. It described the photo accurately and returned visual matches. The first result was the exact same photo on americanboard.org, followed by many visually similar baby photos. The Wikimedia Commons source did not appear among the visible results.
Yandex Images worked. It found the exact 1,280 by 854 image on many sites. Its Sites tab listed 20 sites using it, including Ukrainian, Yiddish, Chinese and Sinhala Wikipedia pages. No commons.wikimedia.org link appeared in those first 20 sites.
TinEye worked best. It reported 515 results after searching 86.7 billion images, first indexed on 2 March 2008. Filtering by website showed 4 results from wikimedia.org, including the exact source, commons.wikimedia.org/wiki/File:Baby.jpg, filename “Baby.jpg”, 1,280 by 854, 262.3 kB. It also found the image on English Wikipedia pages such as Roots of Empathy and Babbling.
Pinterest failed as a reverse image search, as it has in every test this round. The tool’s Pinterest button does not perform an image search at all. It opens a Pinterest keyword search for the image host’s domain, and the 29 pins shown were unrelated, including a Taj Mahal photo and a peacock. The baby photo was not among them.
Five of the six engines genuinely searched the image and found it. Only TinEye traced it back to the exact Commons file page, which is the point that matters here. This photo has been on the web since 2008 and has been reused on hundreds of pages. A reverse search finds it in seconds. That is exactly why a passport photo must be a fresh photo of your child, taken in the last month, and not a picture found online.
The lesson from both checks is the same. A cute baby photo and a compliant passport photo are different things, and the difference is not the camera. It is the sheet, the light, the framing and the date. Check the file before you upload it, and check the picture against the age band in the table at the top of this article, not against the adult rules.
Photo booth or at home: which works better for a child?
Adults are usually better served by a booth’s technical reliability. For children the balance tips the other way, and it is worth being explicit about why.
| Consideration | Photo booth | At home |
|---|---|---|
| Attempts | One sitting | As many as you like |
| Seat height | Fixed, adult-scaled | You choose |
| Flash | Yes, direct | None needed |
| Second adult to hold attention | Awkward in a booth | Easy |
| Background and dimensions | Handled | Yours to manage |
| Reviewing at full size before committing | Limited | Yes |
A booth solves the background, the framing and the file. Those are the parts of a child’s photo that go wrong least often. What goes wrong is expression, gaze, eyes shut on the flash, and a head at the wrong height for a fixed stool, and a booth makes every one of those harder rather than easier. The exception is a child old enough to sit still and follow instructions, where a booth is quick and adequate.
If you do use a booth, take the photo code, not just the prints. The code lets you add the digital photo to an online application, and it avoids the scan-and-upload step that introduces its own failures. Check the booth photo for a bar across the bottom before you leave the shop. Since 8 December 2025, a bar means a rejection, and it is easier to retake it in the shop than to find out by post.
What happens if the photo is rejected?
A rejected photo delays the application. It does not lose the fee, and it does not cancel the application. HM Passport Office asks for a new photo, and the application waits until one arrives. The delay is the expensive part, especially with a five-year renewal cycle and school holidays to plan around, so it is worth getting the photo right the first time.
When you apply online, the service checks your photo when you add it and shows you the photo and the reason for any errors. HMPO’s caseworker guidance describes an override: if the check flags a photo, you can still submit it with a written reason, and an examiner decides. Use that route only when you have a genuine reason, such as a long-term eye patch or a condition that makes the standard impossible to meet. Do not use it to push through a photo you know is wrong. An examiner still looks at the photo and must reject it if it does not meet the standards.
If your child’s photo keeps failing and you cannot see why, the checker messages themselves are the clue. Our guide to fixing a rejected passport photo decodes the messages the online check shows, with the current HMPO Photo Standards version resolved against GOV.UK. That guide owns the adult checker messages, so I will not repeat its decoder table here. Read it, find your message, and fix the one fault it names.
Examiner discretion is real, and it matters most for children. The photo standards are written as guidance for human examiners, with explicit provision for waiving requirements for children. If your child has a condition that makes the standard impossible, submit the best true likeness you can rather than assuming a refusal. A photo that is a genuine likeness, taken in the last month, with a plain background and no other person in frame, is the starting point. The waivers exist for a reason.
A first child passport usually needs a countersignatory, a person who has known the child for at least two years and holds a valid British or Irish passport. If the child is applying for an Irish passport, the photo rules are Ireland’s own: our guide to Irish passport photo requirements covers the DFA sizes, the glasses rule and the under-five exceptions. That is a separate step from the photo, and it is worth sorting out before you take the photo, because the photo must have been taken in the last month when you submit it. A photo taken in January for an application submitted in March is already too old.
How much does a child passport cost, and how long does it last?
A child passport costs £66.50 online or £80 by post, according to GOV.UK passport fees. It is valid for five years, against ten for an adult, which means children need a new photo far more often, and a child’s appearance changes enormously across five years, which is the reason for the shorter validity. Budget for a new photo at every renewal, and take it in the same week you apply, not a month earlier.
The five-year cycle also means the age bands matter more than parents expect. A child photographed at 11 months will be photographed again at 5, and then at 10, and the rules will have changed at each renewal. Keep this article bookmarked. The table at the top is the part you will come back to.
If your child also needs a UK eVisa photo, the rules are close to the passport ones but not identical. Our guide to UK eVisa photo rules sets out the three differences that catch people, including the 50KB floor and the rule against reusing a passport photo. And if you are applying for an ETA for a child travelling to the UK, the photo and scan problems are different again. Our UK ETA app photo guide covers the chip-scan fallback and the face-photo rules for that route. And when your child is old enough for a 16-25 Railcard, the photo rules change again: our guide to railcard photo rules lists the file formats each card accepts.
For the wider picture, including how to keep your child’s photos private once they are online, see our face search and photo privacy guide. And if you want to check whether a photo of your child has already been copied elsewhere on the web, you can run it through our free reverse image search tool on the Image Search Techniques homepage. It searches six engines at once, and it will tell you where a picture has already appeared.
At what age do the child passport photo rules change?
Twice: at 1 and at 6. Under 1, your baby need not have their eyes open and may be photographed lying on a plain sheet from above. Under 6, your child need not look at the camera or hold a plain expression. From age 6, the full adult standard applies: eyes open, looking at the lens and mouth closed.
Can my baby smile in their passport photo?
Under 6, yes. GOV.UK says children under 6 do not have to be looking directly at the camera or have a plain expression, so a smile or an open mouth is allowed. From age 6, no. A plain expression with the mouth closed is required, and smiling widely, pouting or frowning will be rejected.
Can I be in the photo with my baby?
No. Children must be on their own in the picture at every age. For a baby under 1, you may support their head with your hand, but your hand must not be visible in the photo. A visible hand or arm is now referred to the Exceptions Handling Team, so keep your hand flat under the sheet, below the frame.
How long is a child’s passport photo valid, and what does a child passport cost?
It must have been taken in the last month when you submit it. Once HM Passport Office has received it, a child’s photo has a 6-month shelf life, against 12 months for an adult. A child passport costs £66.50 online or £80 by post, and it is valid for five years.