🔎 Reverse Image Search
Image search techniques made simple: upload a photo or paste a URL and search 6 engines at once. 100% free, nothing stored.
🔒 Your image is never stored on our servers longer than 24 hours and is never shared.
Almost every home has a drawer with a mystery cable in it: a lead with no label, a plug that fits nothing you own, a charger left behind by a guest. The question is always the same, what cable is this, and a single photo is usually enough to answer it, provided the photo shows the right things. This guide shows you exactly what to photograph, how to read what you see, and when to stop and check the safety label instead of plugging anything in.
Short answer: Photograph both ends of the cable, count the pins, and place a coin beside it for scale. Match the shape, pin count and any printed text against the connector table below. It names most common cables in a few minutes, but never plug an unidentified power adapter into the mains until you have read the ratings label on it.
What “identifying a cable from a photo” means: matching the visible shape, size, pin layout and markings of a plug or socket to a named connector standard, so you know what the cable is for and what it will fit.
What can a photo actually tell you about a cable?
A good photo answers three questions: what shape is the plug, how many pins or contacts does it have, and what is printed on it. Shape alone narrows most cables to a small family. USB-C is a smooth oval that fits either way up. Micro-USB is a small trapezoid. A barrel jack is a round tube with a hole in the middle. An HDMI plug is a wide, flat blade. Those shapes are distinct enough that a straight-on photo of the plug face is often all you need.
The pin count finishes the job. Two plugs can look alike at a glance and differ only in pins: a 3.5 mm headphone plug has two black bands for stereo (TRS) and three for a headset with a microphone (TRRS); a VGA plug has fifteen pins in three rows; a DVI plug has a grid of twenty-four. Counting the pins in a close-up photo separates look-alikes that shape alone cannot.
Printed text is the third clue. Many cables carry tiny lettering on the plug housing or along the cable itself: a brand name, a model number, or a standard such as “USB 3.2” or “HDMI”. Even a fragment helps, search the exact printed text and you often land on the maker’s own listing. If the cable came with a device, note the device’s maker and model number too; that is frequently faster than identifying the plug at all. Light bulbs carry the same kind of printed identification, learn how to identify a light bulb from a photo by reading its base code and the numbers on the glass.
Be honest about what a photo cannot tell you. It cannot show the voltage a power adapter delivers, the wattage a USB-C cable supports, or whether the wiring inside is correct. A photo identifies the connector; the ratings label identifies what is safe to do with it. That distinction is the whole point of the safety section below, and it is why this guide never asks you to plug an unknown cable in just to see what happens.
How do you photograph a cable so it can be identified?
Follow this routine, the both-ends, pin-count and coin-scale method, and your photo will carry everything a person or a search engine needs. It takes about two minutes.
- Photograph both ends. Lay the cable flat and photograph each plug separately. The two ends often belong to different families (USB-A on one side, USB-C on the other), and the second end frequently gives the answer away. If you only photograph one end, you may identify half a cable.
- Shoot the plug face straight on. Hold the phone directly in front of the plug, not at an angle, so the pin layout is visible and undistorted. A photo taken from the side hides the pins and makes every connector look like a rectangle.
- Count the pins and write the number down. Zoom into the photo and count the gold contacts or holes. Write the count on a piece of paper next to the cable or in your notes, “oval, 24 pins” is a far better search than “small silver plug”.
- Add a coin for scale. Place a coin beside the plug in the same photo. Connector families differ by millimetres, USB-C is about 8 millimetres wide, Micro-USB about 7, and without scale, a close-up of a small plug and a large one look identical.
- Photograph the whole cable laid flat. One wide shot shows the length, the thickness, and whether the cable splits, has a ferrite bead, or carries an in-line control box. Thick cables usually carry power; thin ones usually carry data or audio only.
- Capture any printed text. Turn the plug over and photograph the lettering on the housing, and any text printed along the cable. Use your phone’s zoom rather than moving closer, which blurs the text. Read the text aloud into your notes if it is hard to photograph.
- Run a reverse image search on the plug-face photo. Upload the straight-on shot to a reverse image search and see whether the same connector appears in listings or guides. A reverse search is often the fastest route from a photo to a name, and our guide to reverse image search walks through the steps. If the search comes back empty, the shape and pin count you recorded will still get you there through the table below.
Two common mistakes ruin identification photos. The first is photographing the cable in a dark drawer, where the plug is a black shape on a black background, lay it on a plain light surface instead. The second is photographing only the middle of the cable, which shows nothing at all. Both ends, face-on, with a coin: that is the whole routine.
What cable is this? Match it in the connector table
Use the table below to match what you photographed. Find the row whose shape and pin count match your plug, then check the “usually for” column against the device the cable came with. If two rows look similar, the pin count and the coin-scale width settle it.
| What you see | Connector | Pins | Usually for |
|---|---|---|---|
| Small oval plug, fits either way up | USB-C | 24 | Phones, laptops, tablets |
| Flat rectangle, blue or black tongue | USB-A | 4 | Computer end of a cable |
| Small trapezoid, wider at the bottom | Micro-USB | 5 | Older phones, e-readers |
| Small trapezoid, chunkier body | Mini-USB | 5 | Older cameras, sat navs |
| Slim flat plug, 8 gold contacts | Lightning | 8 | Older iPhone and iPad |
| Square plug, bevelled corners | USB-B | 4 | Printers, scanners |
| Round barrel with a hole in the middle | Barrel jack (DC) | Centre pin + sleeve | Routers, monitors, chargers |
| Wide flat plug, small pins in a row | HDMI Type A | 19 | TV, monitor, console |
| Narrower flat plug, 19 pins | Mini or Micro HDMI | 19 | Cameras, small tablets |
| Notched rectangle, pins in two rows | DisplayPort | 20 | PC monitors |
| Blue trapezoid, pins in three rows | VGA (DE-15) | 15 | Older monitors, projectors |
| White block, grid of small pins | DVI | 24 | Older monitors |
| 3.5 mm metal pin with black bands | 3.5 mm jack (TRS/TRRS) | 3–4 poles | Headphones, audio |
| Single round pin with a metal ring | RCA (phono) | 1 + shield | Hi-fi, AV equipment |
| Round metal plug, three pins | XLR | 3 | Microphones, pro audio |
| Wide clear plug, eight gold pins | RJ45 Ethernet | 8 | Network cables |
A few pairs in the table deserve a second look, because they are the ones people mix up. USB-C and Micro-USB are both small and silver, but USB-C is a smooth oval with a flat tongue and no notch, while Micro-USB is a trapezoid with a tiny tongue and a notch on one side. Mini-USB looks like a larger Micro-USB and is wider still. HDMI and DisplayPort are both flat video plugs, but HDMI is wider with a single row of pins and DisplayPort has a notched corner and two rows. A barrel jack is identified by measuring the outside and inside diameter, the most common sizes are 5.5 mm outside with a 2.1 mm or 2.5 mm centre pin, and a pair of cheap callipers, or a ruler held against the photo with the coin for scale, is enough to tell them apart.
If your plug matches no row, note the shape, pin count and width and move to the worked example method below: a reverse image search on the plug-face photo, or asking an AI assistant about the photo, will usually place an unusual connector into its family even when the table does not. Our guide to identifying a photo with ChatGPT and Gemini shows how to ask, and what to double-check in the answer.
Worked example: two USB-C plugs, identified without a search engine
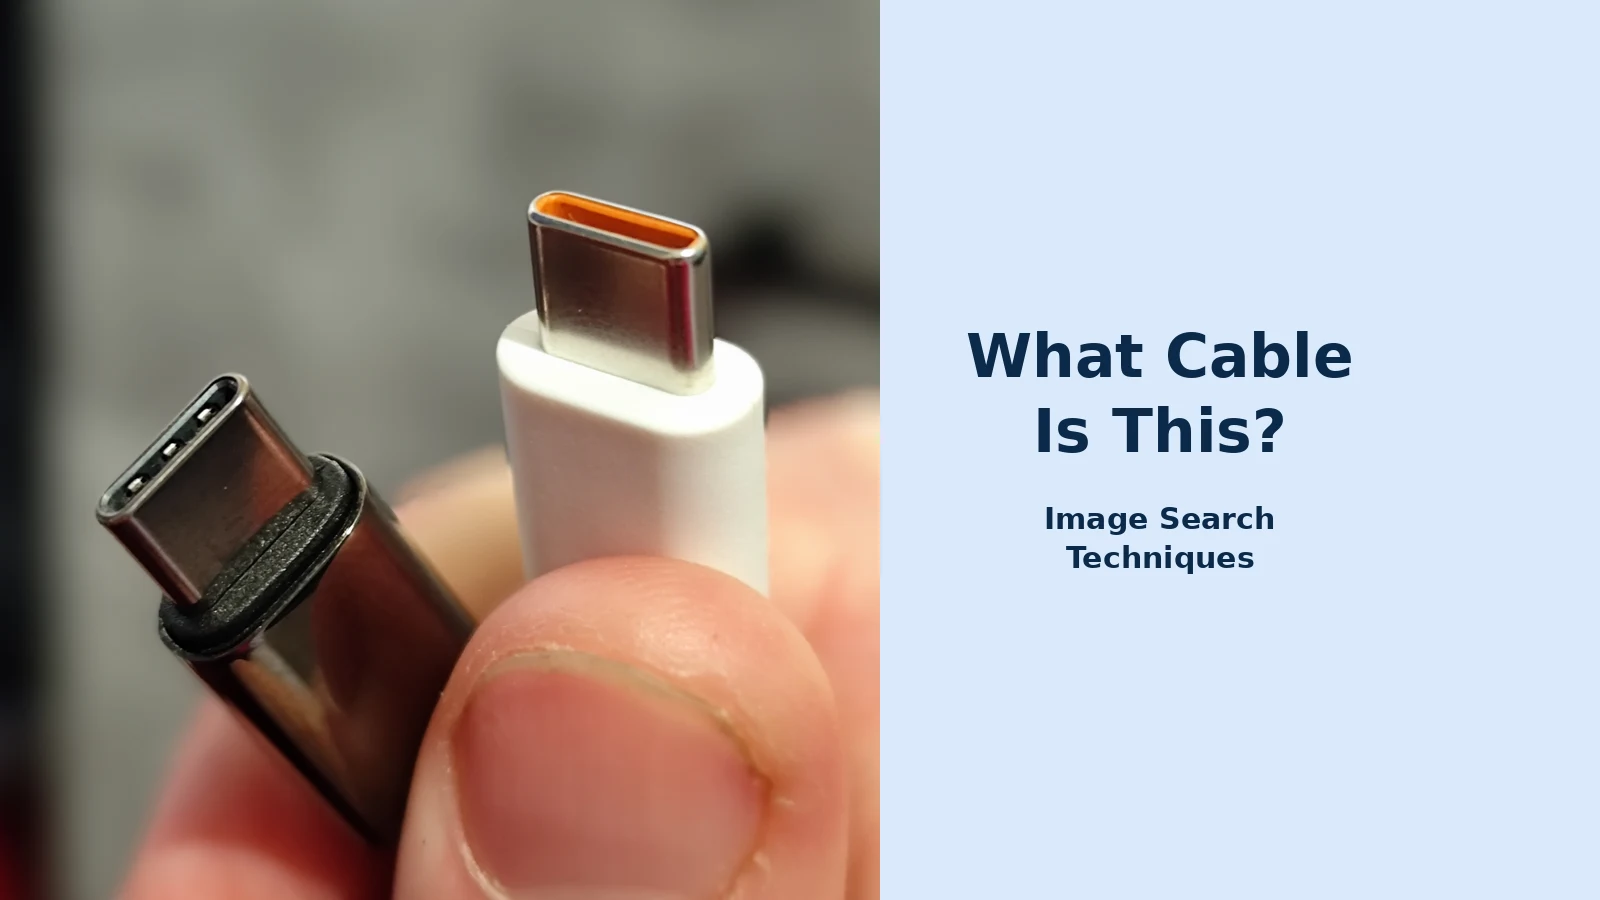
To test this guide honestly, I ran the routine on a real photo: a close-up of two USB-C male connectors held in someone’s fingers, photographed on 14 August 2024 and published under a Creative Commons Attribution 4.0 licence by Logant547 on Wikimedia Commons. The left plug belongs to a black Baseus “Tungsten Gold” cable and the right to a white Xiaomi 6A cable, according to the photo’s own description. I chose it because it looks like the kind of photo a reader would take, two similar plugs side by side, no labels visible, no device in frame.
First I tried the search-engine route, exactly as a reader would. I ran the image URL through Google Lens, using the “paste image link” method Google documents on its own support pages, and through TinEye’s search-by-URL. Both were blocked on the day: Lens returned a 429 response with an “unusual traffic” CAPTCHA page, and TinEye returned a 403. No results came back from either engine. That is a real and common outcome, URL-based searches are frequently blocked by bot protection, and it is worth knowing before you rely on them. Uploading the same photo directly from your phone, rather than pasting a link, is the route Google’s own help page documents for searching with an image from your device, and it is the one that normally works.
So the identification had to come from the photo routine, which is the point of this worked example. Both plugs have the smooth oval metal shell, the flat tongue inside, and no notch or taper, the USB-C shape. The photo is a straight-on shot with the plugs held in fingers, so the scale is readable against the fingertips. Both are USB-C, which the photo’s own description confirms. The orange interior on the right-hand plug is the maker’s own marking for its 6-amp cable, and the photo’s description notes that 6-amp current is not typically supported by the USB-C specification, so treat that orange colour as the maker’s claim, not as a guarantee of what the cable can carry. The left plug shows three extra pins at the edge, a grip feature the description mentions. None of that changes the identification, but it shows how much a single close-up can tell you once you know what to look for: family, likely standard, and a warning not to trust a colour code as a specification.
The lesson from this test is practical rather than discouraging. Reverse image search is a useful first step, and Google reverse image search is the tool most readers will reach for, but it is not the only step and it is not always available. When it is blocked or returns nothing, the shape, pin count and scale in your own photo still name the connector, which is why this guide teaches the routine first and the search second.
What if the cable is a power adapter? Read the label before you plug it in
This is the one rule in this guide that is not optional. Never plug an unidentified power adapter into the mains, and never connect an unidentified charger to a device, until you have read the ratings label on the adapter itself. A connector that fits is not proof that the voltage, current or polarity matches, and a wrong adapter can damage the device or start a fire. Identification tells you what the plug is; only the label tells you what it delivers.
Read the label in three places. First, the input: it should say something like “Input: 100–240 V”. Second, the output: it should say something like “Output: 5 V, 2 A” (the symbol ⎓ means direct current). Third, the polarity diagram, a small drawing of a dot and a C-shape, which shows whether the centre pin is positive or negative. All three must match the device the adapter is meant for, check the device’s manual or the label near its own power socket, which usually states the required voltage and current.
Electrical Safety First, the UK consumer safety charity, warns that counterfeit and substandard chargers are a genuine fire and shock risk, and its own testing of counterfeit and look-alike Apple chargers found that 49 out of 50 failed one or more safety tests. Its mobile phone and tablet safety advice gives a simple three-point check: look for the maker’s name, a model number and a UKCA or CE mark (while remembering marks can be faked), check there is at least 9.5 mm between the live and neutral pins and the edge of the plug, and check that the output voltage and current marked on the charger match your device. If the label is missing, illegible, or the numbers do not match, do not use the adapter. Buy a replacement from the device maker or a reputable retailer, matched to the device’s stated requirements.
The same caution applies to barrel-jack adapters, which are the worst offenders for look-alike danger: two adapters can share the same 5.5 mm barrel and deliver different voltages or opposite polarity. The barrel size tells you the plug will fit; it tells you nothing about the electricity. Check the label, and if the label is gone, treat the adapter as unknown and replace it rather than guessing. A replacement adapter costs far less than a damaged device.
When is a photo not enough to name the cable?
Some cables defeat a photo, and it is better to know that early than to force an answer. Proprietary laptop chargers are the classic case: several makers have used similar-looking barrel or magnetic plugs with different voltages, and only the label or the laptop’s model number settles it. Internal cables, the flex cables inside a tablet or laptop, and the small white JST-style board connectors inside gadgets, are another: a photo can place them in a family, but the exact part number comes from the device’s service manual or the maker’s support pages.
In those cases, use the photo as the starting point rather than the answer. Search the device’s maker and model number together with the words “charger” or “cable”, and compare your photo with the maker’s own listing. If the maker’s page is unhelpful, community forums where people post the same question, electronics and repair forums are full of “identify this connector” threads, can help, but treat any answer as a lead to verify against the label or the manual, not as a conclusion. The same discipline applies to the rest of this site: our What Is This Picture guide explains how to work through an unknown object in a photo step by step, and the same identify-by-photo approach works for other objects too, see our guide to identifying a car part from a photo for a worked example in a different family of objects.
A photo can also mislead when the cable is damaged or modified. A plug with a bent shell, a missing pin, or a replaced end may not match any row in the table, and a cable that has been cut and re-joined may not be the cable its plug suggests. If the plug looks damaged, do not try to use it to test your identification, a damaged plug is a reason to replace the cable, not to keep investigating it.
What to do once you know the name
Once the connector has a name, the rest is straightforward. Search for the name plus the device it belongs to, and buy the matching cable, checking the length, and for USB-C, the wattage and data-speed rating printed on the listing, since not every USB-C cable charges at the same speed or carries video. Keep the photo you took: it is useful if you need to order a replacement later, or to show a shop assistant exactly what you need.
If the cable belongs to a device you no longer own, label it before it goes back in the drawer. A strip of tape with the connector name and the device it came from turns next year’s mystery cable into a two-second identification. That small habit is the real payoff of this guide: the next time someone asks “what cable is this”, you will already have the answer written on it.
Can I identify a cable from a photo of one end only?
Sometimes, if the one end is distinctive (USB-C’s oval, HDMI’s shape). But many cables share one end, so photograph both ends: the other end often gives the answer away, and a cable is only useful if both ends match your devices.
How do I tell USB-C from Micro-USB in a photo?
USB-C is a smooth oval about the width of a thumbnail and fits either way up, with a flat tongue inside. Micro-USB is a small trapezoid, wider at the bottom than the top, with a tiny tongue and a notch. Put a coin beside the plug: USB-C is about 8 millimetres wide, Micro-USB about 7.
Can a photo tell me whether a charger is safe to use?
A photo can show warning signs, scorch marks, a loose or cracked plug, missing safety marks, or a label that does not match the device. It cannot prove a charger is safe inside, where the danger lives. If the label is missing or unreadable, or the plug looks damaged, do not use it and replace it from the maker.
What should I photograph if the cable has no markings at all?
Photograph both ends straight on, the full cable laid flat, and any moulded shape or colour on the plug housings. Add a coin for scale and note the device it came with, including the maker’s name and model number. Those details, plus a reverse image search, usually narrow an unmarked cable to one or two candidates.